File Upload
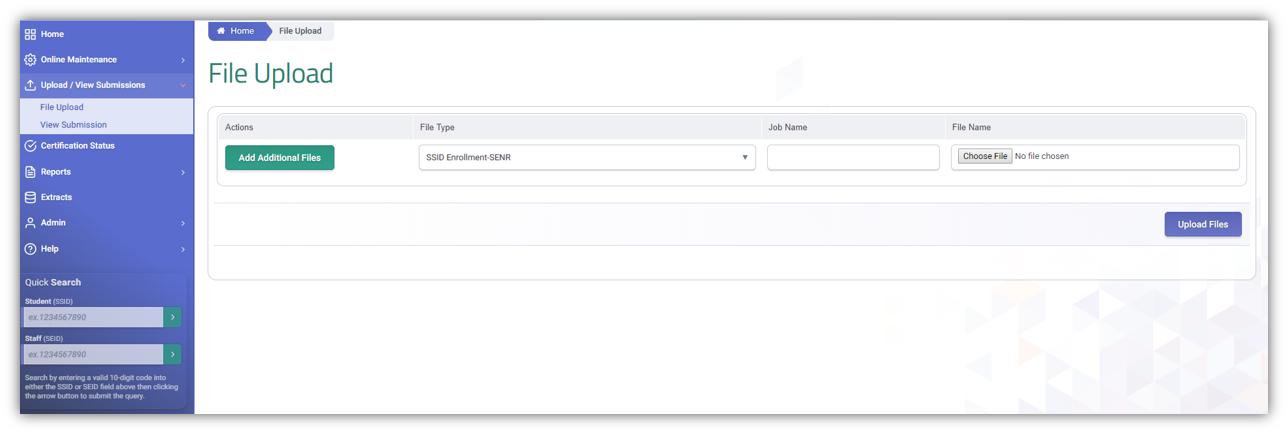
The “Upload File” screen features the interface that facilitates the batch file submission process. A user may select files through this interface to submit state reporting data and to post the data in the ODS. The interface allows the user to upload multiple files at a time and to upload the different State Reporting file types in the same upload. The File Name for each file should be significant to the specific data in the file. The system will assign each file being uploaded a unique Job ID. The user will have the option to give each file a user- selected Job Name for easy identification and reference to a group of files or a single file being uploaded.
User Access Roles
- All or selected file type Edit roles (e.g. SENR Edit roles)
- All or selected file type View roles (to view file type details when troubleshooting an error)
- Student Search (to be able to search a SSID when troubleshooting an error )
CALPADS Batch File Upload Structure
The structure of the file should conform to the order and data type listed in the record layouts described in the sections below. CALPADS will accept files in the following formats:
- Comma Separated Value format (CSV)
- Caret Separated Value format
- Extensible Markup Language (XML) format
- Excel Spreadsheet format (.xlsx)
Files submitted in Comma Separated Value or Caret Separated Value format must not contain a header row. Each record must end with a carriage return and line feed.
XML formatted files must utilize the CALPADS XML schema provided in Appendix A of the CALPADS File Specification document. Non required data elements with no value must be included in the data submission.
An Excel Spreadsheet format may contain one row of column names.
Additionally, Excel Spreadsheet templates will be distributed to those LEAs that wish to use an Excel spreadsheet format.
Uploading a File
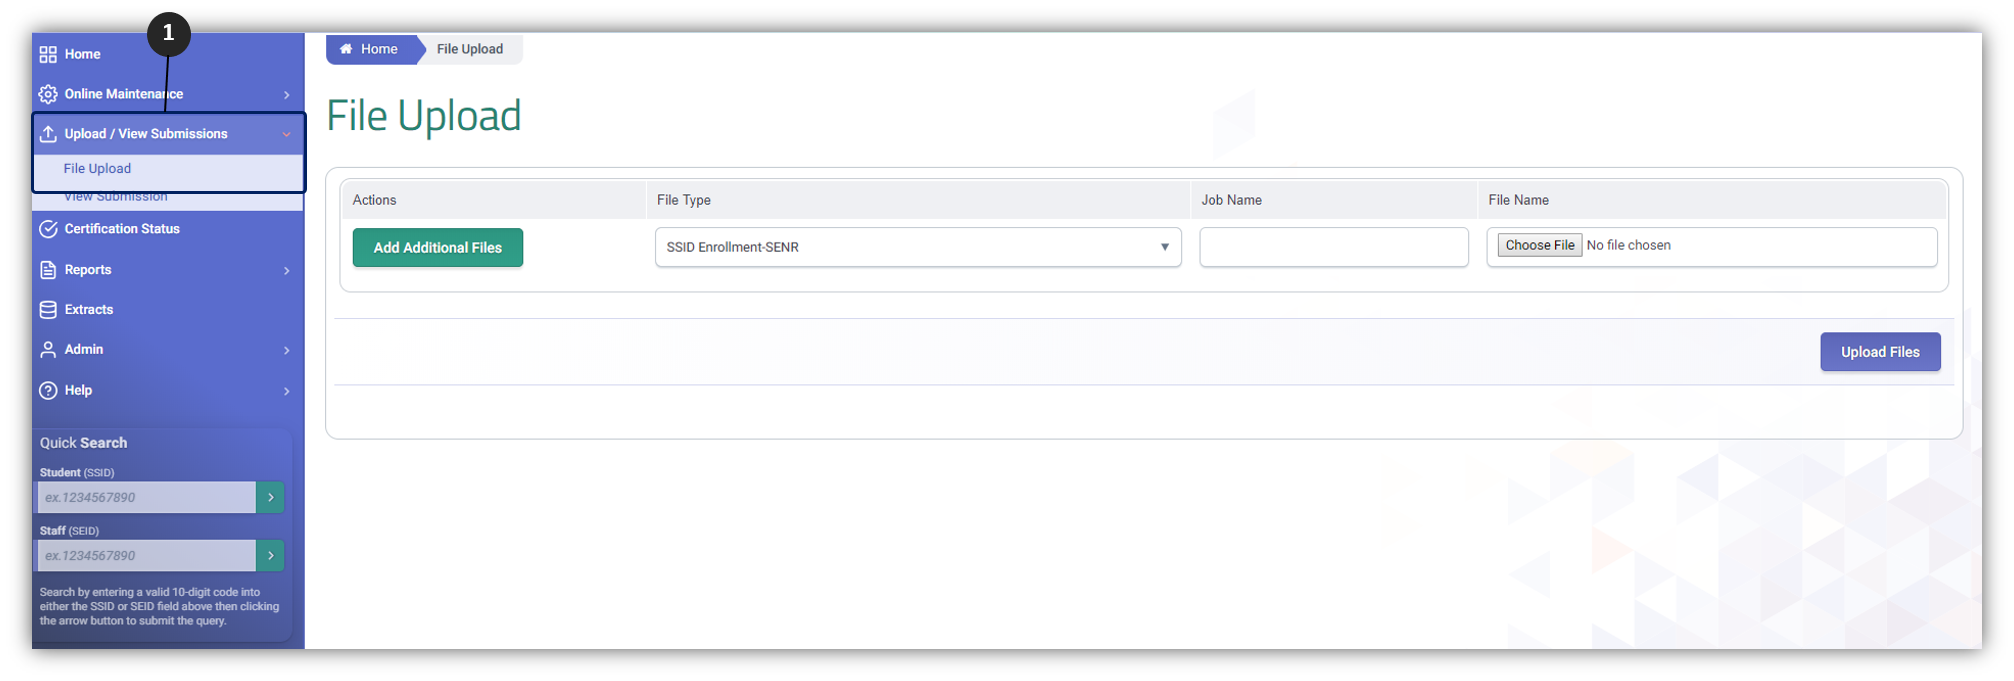
Step 1. From the Left Navigation menu, click on Upload/View Submissions link. Click on File Upload.
Step 2. The File upload screen will appear where the user can select the file type, indicate the JOB Name and choose the file to upload from a local folder.
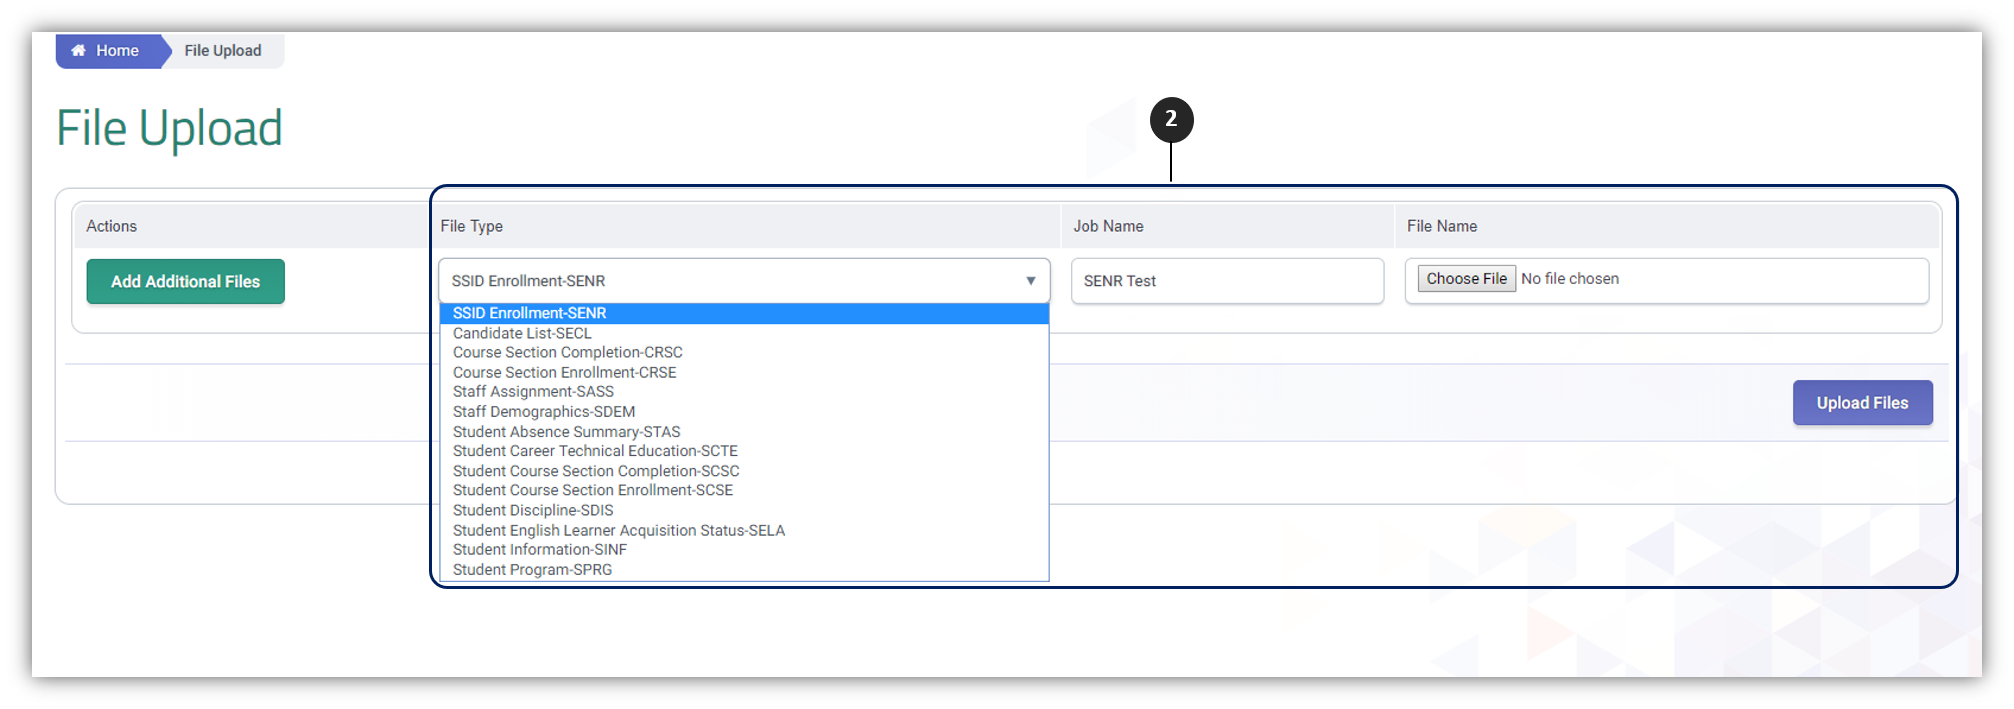
NOTE: By default, the SSID-Enrollment (SENR) file type is selected. However, user can choose a different file from the dropdown. When uploading files that include SENR and some other file type, it is important to upload and poste the SENR first before uploading the next file types.
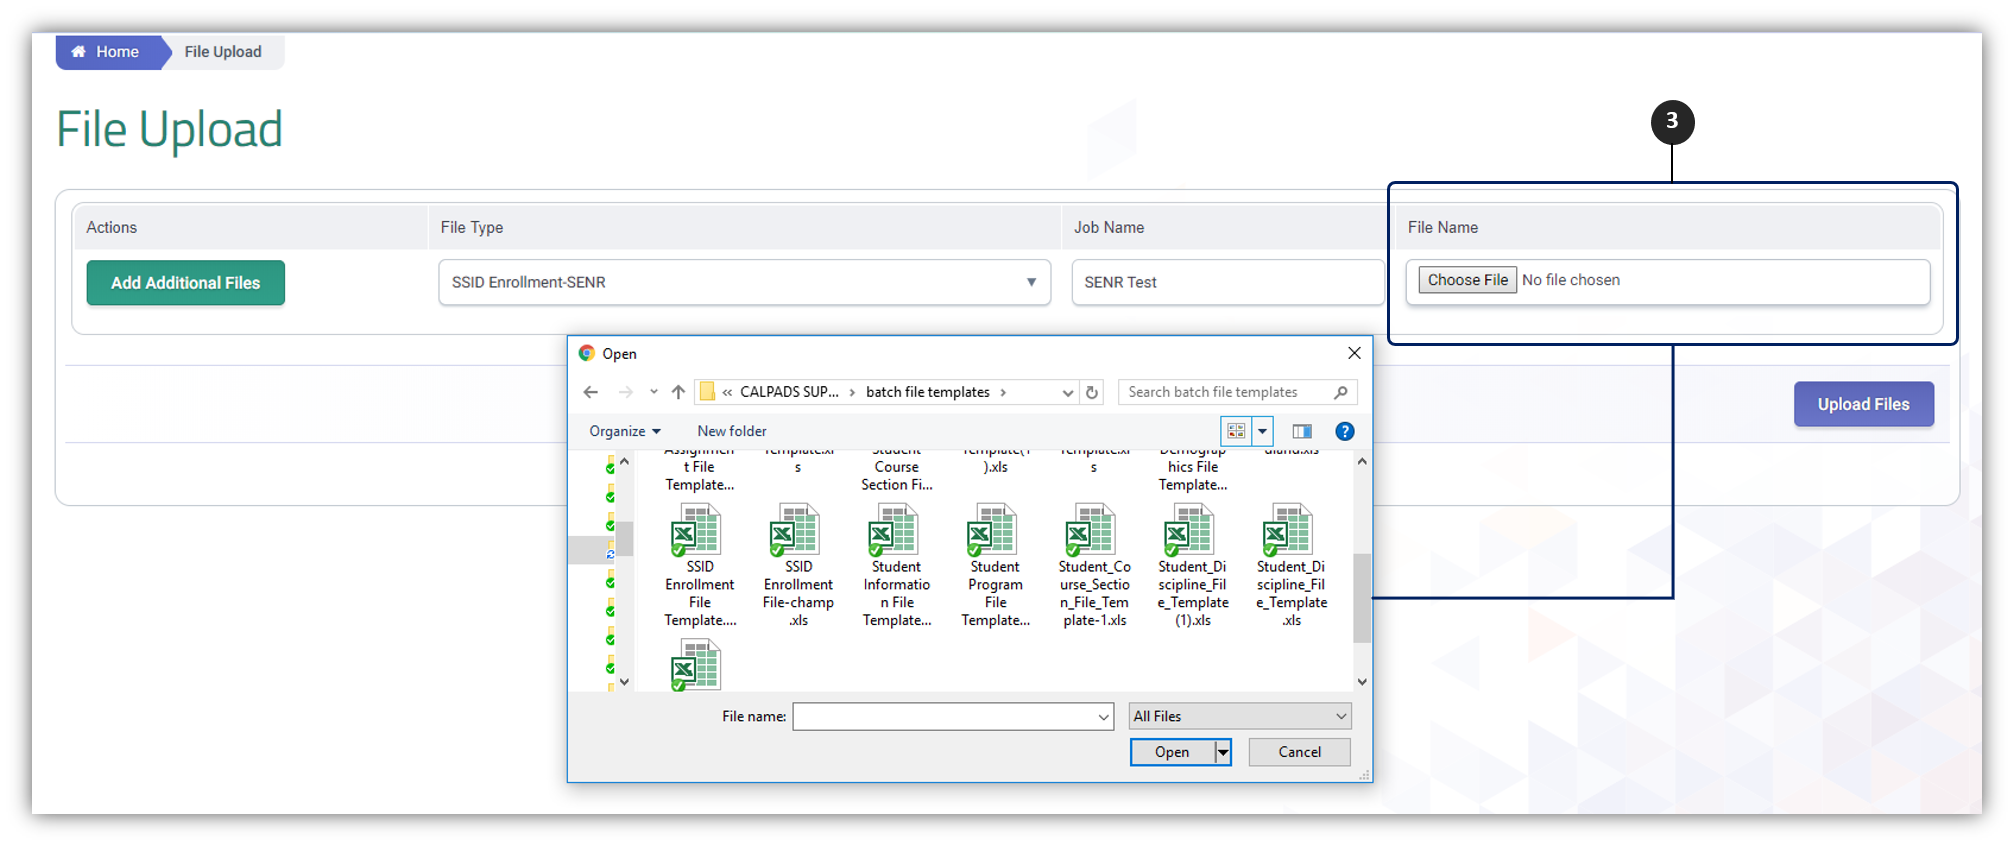
Step 3. Choose the local file appropriate to the indicated file type. Then click on Upload Files button.
The system will enforce the following defined user interface rules:
-
If a user uploads a file with a name matching an existing File Name during a submission process, the system will display the following message: “Duplicate File selected. A file can be selected for upload only once.”
-
If a user upload a file with no records, the system will display the following message: “No records found in file, upload has stopped processing.
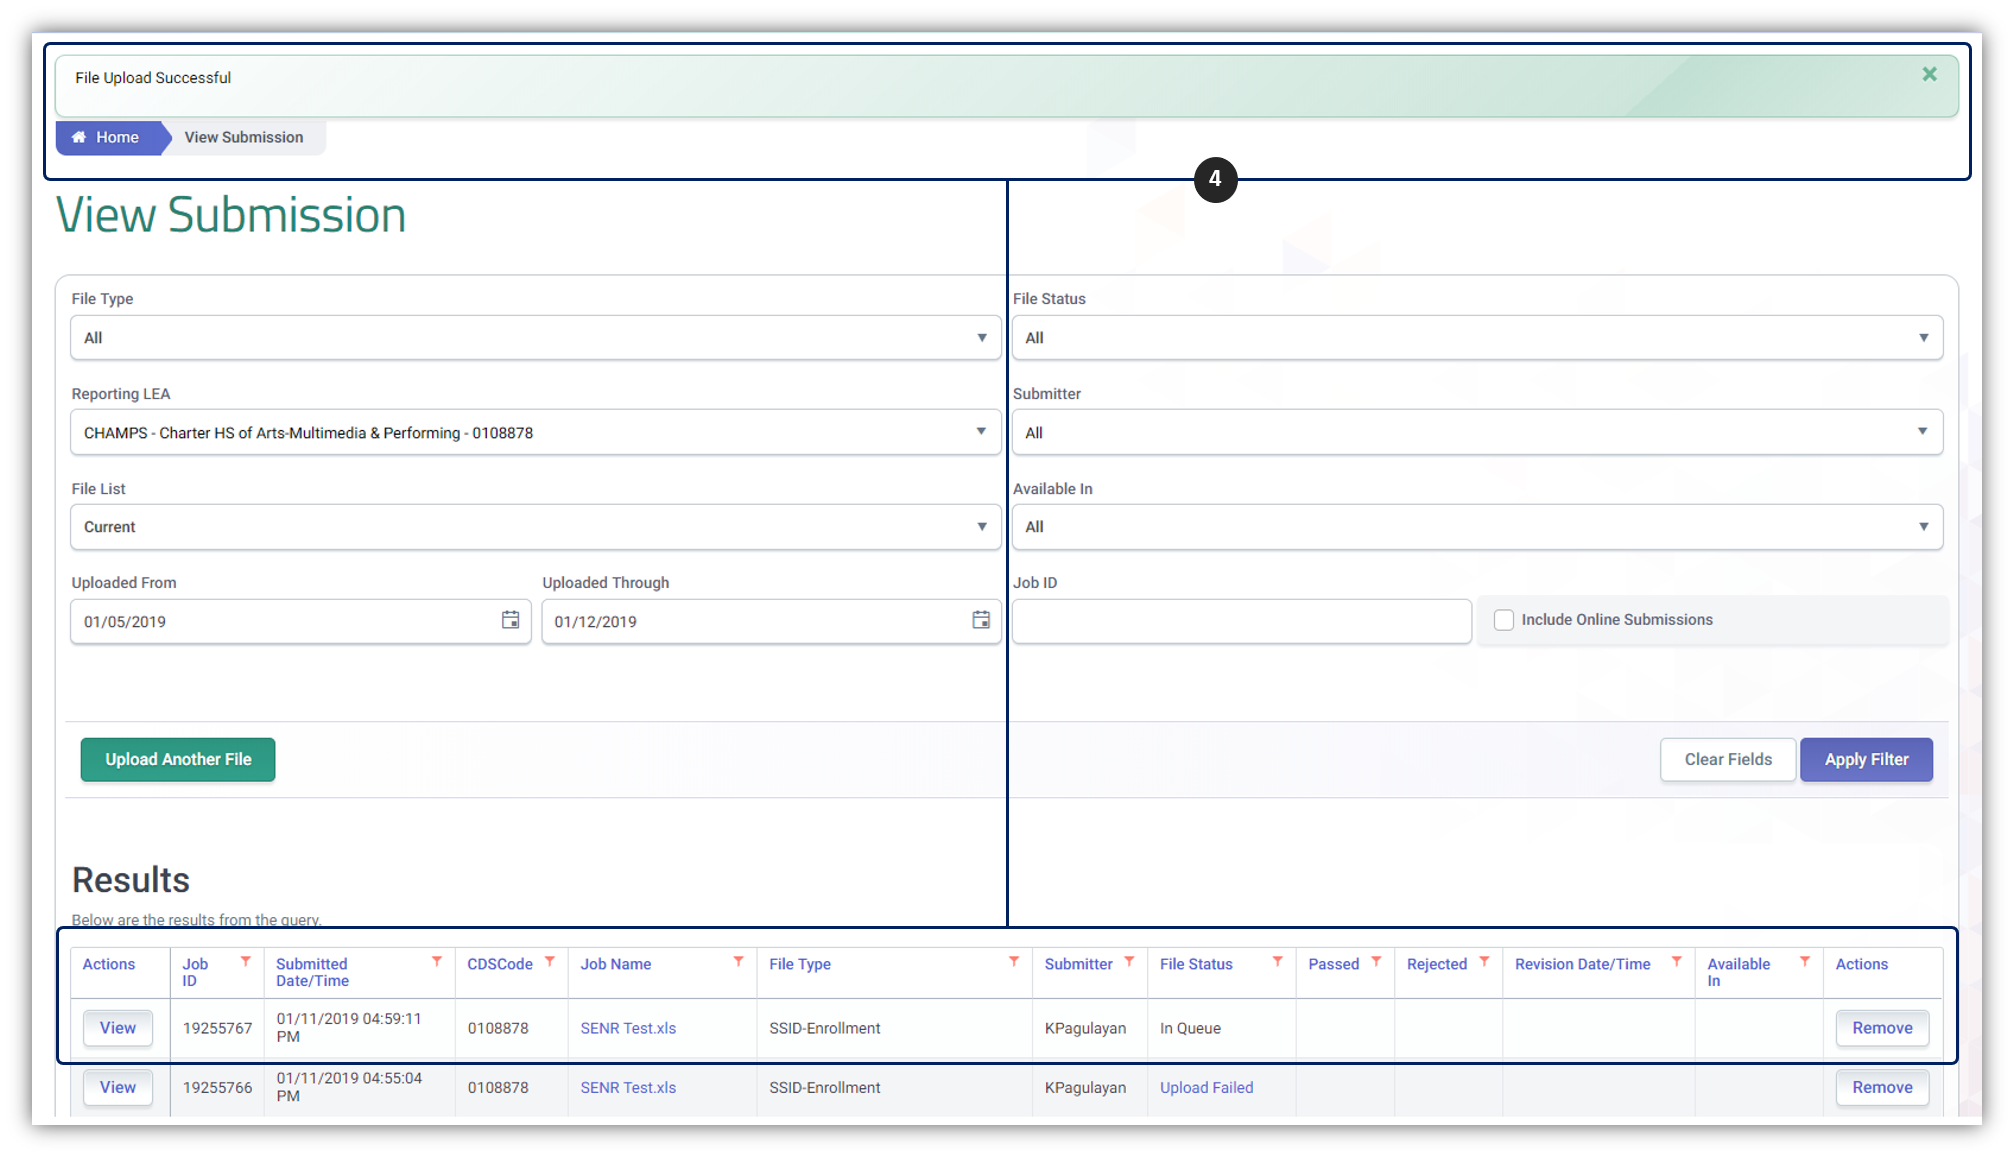
Step 4. Once the file is uploaded, the user is redirected to the View Submission page where a notification of successful upload appears. Clicking on Apply filter or refreshing the page, reflects the uploaded file under results.
Upload Validation Processing Errors
Users may also encounter some error during file upload. The system performs the following validation processing and returned results:
-
If a file name is more than 100 characters, the system will display an error message.
-
If a file format is not .XSLX, .XML, TXT, and .CSV the system will display an error message.

- If a user selects a duplicate file, the system will display an error message.

-
If a user selects a File Type that doesn’t match the file type that is uploaded (i.e., Student Enrollment is selected and the file type uploaded is SASS), the system will display the following error message:
-
“Error: The File Type selected for file ([Insert user’s File Name]) is [Insert file type selected from file upload dropdown list]. It does not match the file type referenced in the file ([Insert file type from file that was upload}) Please select the correct File Type and resubmit. No file was processed.”

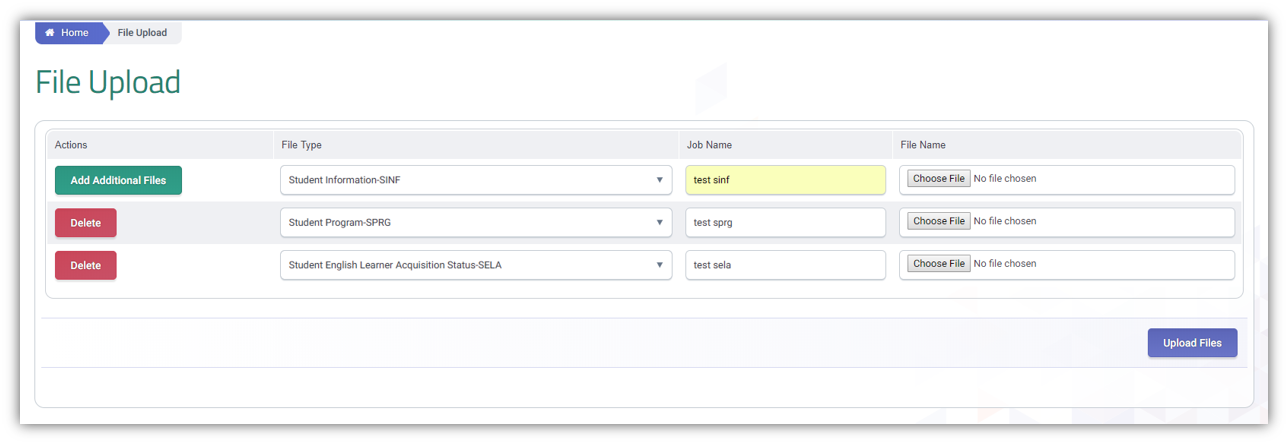
Multiple File Upload
A user have the ability to upload one or more batch files at once. However, when uploading files that include SENR and some other file type, it is important to upload and post the SENR first to gain ownership of a SSID/student before uploading the next file types.
To upload multiple files, click on Add Additional Files button to bring up another row of file type to add.
CALPADS File Upload Processing Methods
Updated as of 8/17/2022
There are three main processing methods of data in CALPADS:
Transaction Processing
Individual record transactions are submitted and managed using a defined operational key. Records are added/updated using transaction types of “” (empty string), or “ “ (space), or “A” (Add/Update) all of which cause the system to act in the same way. Records are deleted using the transaction type of “D” (Delete). Records are replaced using the transaction type of “R” (Replace) and will only replace if record exists and data has changed for non-operational key fields or insert if record does not exist.
Effective Date Processing
Data are managed in CALPADS using Start and End effective dates. Users can establish start and end dates for specific information. Records are added/updated using transaction types of “” (empty string), or “ “ (space), or “A” (Add/Update). Records are deleted using the transaction type of “D” (Delete). Source data in the LEAs Student Information System does not need effective dates for CALPADS data collection purposes because CALPADS will store the data for an LEA based on effective dates provided in the submission file.
Replacement Processing
Records are processed based on the operational key. Records may be replaced using transaction types of “” (empty string), or “ “ (space), or “R” (Replace) all of which cause invoke the same system behavior. Records may be deleted using the transaction type of “D” (Delete). If the transaction type is “D” (Delete), then all records in CALPADS with the same operational key are deleted even if only one record with that operational key was submitted. Submitted data are processed using the operational key to identify which records will be processed. For batch, all the records in CALPADS with the same operational key are deleted even if only one record with that operational key was submitted and all newly submitted records in the submission with the same operational key or any other operational key are added. For online maintenance, individual records in CALPADS with the same primary key are deleted and replaced.
For batch processing, although the transaction types “” (empty string), “ “ (space), “A” (Add/Update), “R” (Replace), and “D” (Delete) may all be included within the same file submission, CDE does NOT recommend including more than one transaction type per file submission. If more than one transaction type is included in a single file submission, records from ODS (based on the different operational keys for a file type) are compared to records in a file submission and are posted in the following order by transaction type: Delete, Add/Update or “ “ (space), and then Replace. However, there is not an order by transaction type for validation processing. Some validations exclude Delete records whereas others may exclude Replace records. For this reason, it is important to note if an LEA chooses to include more than one transaction type in a single file submission, validations may not trigger as expected.
Each of the CALPADS record types is associated with one of the processing methods identified above. In addition to the processing method, an operational key is identified for each record type. The operational key for each record type is essential for identifying a record or group of records in CALPADS. For the purposes of the CALPADS processing methods, the current Academic Year ID or Academic School Year is based on the processing date. The table below depicts the processing type and operational key for the various CALPADS record types.
Record Types and Processing Methods
Each of the CALPADS record types is associated with one of the processing methods identified above. In addition to the processing method, an operational key is identified for each record type. The operational key for each record type is essential for identifying a record or group of records in CALPADS. For the purposes of the CALPADS processing methods, the current Academic Year ID or Academic School Year is based on the processing date. The table below depicts the processing type and operational key for the various CALPADS record types.
Record Type and Processing Table
| Number | Record Type | Processing Type | Operational Key |
|---|---|---|---|
| 1 | SSID Enrollment (SENR) | Transaction Processing | School of Attendance, SSID, Enrollment Start Date. |
| 2 | Student Information (SINF) | Effective Date Processing | SSID, Effective Start Date |
| 3 | Student Program (SPRG) | Transaction Processing | School of Attendance, SSID, Education Program Code, Education Program Membership Start Date, Education Service Academic Year, Education Service Code. |
| 7 | Staff Demographics (SDEM) | Effective Date Processing | Reporting LEA, SEID |
| 8 | Staff Assignment (SASS) | Replacement Processing | School of Assignment, Academic Year ID |
| 9 | Course Section (CRSE/CRSC) | Replacement Processing | School of Course Delivery, Academic Year ID, Academic Term Code |
| 10a | Student Course Section Enrollment (SCSE) | Replacement Processing | School of Course Delivery, Academic Year ID, SSID, Academic Term Code |
| 10b | Student Course Section Completion (SCSC) | Replacement Processing | School of Course Delivery, Academic Year ID, SSID, Academic Term Code, Marking Period Code |
| 11 | Student Career Technical Education (SCTE) | Replacement Processing | School of Attendance, Academic Year ID |
| 12 | Student English Language Acquisition (SELA) | Transaction Processing | Reporting LEA, SSID, English Language Acquisition Status Code |
| 13 | Student Absence Summary (STAS) | Replacement Processing | School of Attendance, Academic Year ID |
| 17 | Postsecondary Status (PSTS) | Replacement Processing | Reporting LEA, Academic Year ID, SSID, Education Program Participation Type Code, Postsecondary Status Code |
| 18 | Student Incident (SINC) | Replacement Processing | School of Attendance, Academic Year ID, Incident ID Local |
| 19 | Student Incident Result (SIRS) | Replacement Processing | School of Attendance, Academic Year ID Incident ID Local |
| 20 | Student Offense (SOFF) | Replacement Processing | School of Attendance, Academic Year ID Incident ID Local |
| 21 | Work-Based Learning (WBLR) | Replacement Processing | School of Attendance, Academic Year ID |
| 22 | Students with Disabilities (SWDS) | Transaction Processing | Reporting LEA, SSID, Reporting SELPA, Special Education Status Effective Start Date |
| 23 | Special Education Plan (PLAN) | Effective Date Processing | Reporting LEA, SSID, Reporting SELPA, Special Education Plan Effective Start Date |
| 24 | Special Education Meetings (MEET) | Transaction Processing | Reporting LEA, SSID, Reporting SELPA, Special Education Meeting Date, Pending As of Date |
| 25 | Student Services (SSRV) | Replacement Processing | Reporting LEA, SSID, Reporting SELPA, Plan Effective Start Date |
| 26 | Local Educational Agency Program (LEAP) | Replacement Processing | Reporting LEA, Academic Year ID, LEA Education Program Code |
Uploading a Batch Delete File
LEAs can submit a batch file to mass delete incorrect records. However, the records to be deleted must be extracted first from CALPADS to ensure all operational key elements are the same. and used to create a batch file. These steps are not applicable to records generated from the Special Education system.
-
Request the appropriate file type ODS download extract from CALPADS.
-
Open the downloaded file in Excel.
-
Replace record type by deleting the -R (e.g. SENR-R to SENR)
-
Add a D to the second column (transaction type column)
-
Download appropriate batch file template.
-
Copy paste the columns with records to the downloaded batch file template
-
Save it as .xlsx
-
Upload and post the records in CALPADS.
-
Once file shows a "Posted" status, you may re-upload the file with the correct records extracted from your SIS.
Additional Resources
CALPADS File SpecificationsDoc
Chapter Chapter 1.3 provides additional information on job file processing methods and scenarios.