Requesting SSID
Request SSID Process through Online Maintenance
The Request SSID page, when accessed through the Online Maintenance sub menu, allows an authorized user to begin the process of requesting an SSID without using the Search for Student process. All fields on the screen will be blank. Since the search conducted through the “Request SSID” page directs the user to SSID assignment for a student, the user must enter complete values for all mandatory fields to determine the correct action through choosing a candidate or having the system generate a new SSID. The system will not validate partial data with the asterisk (*) wildcard.
Step 1. From the Left Navigation menu, click on Online Maintenance and then click on Request SSID.
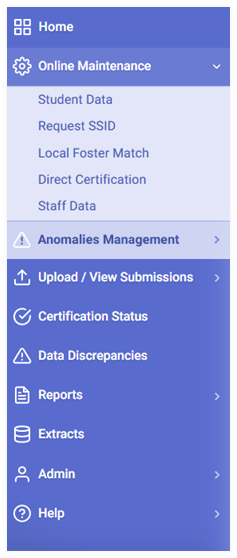
Step 2. System will route you to the Request SSID subsection of the Search by Demographic/Request SSID tab.
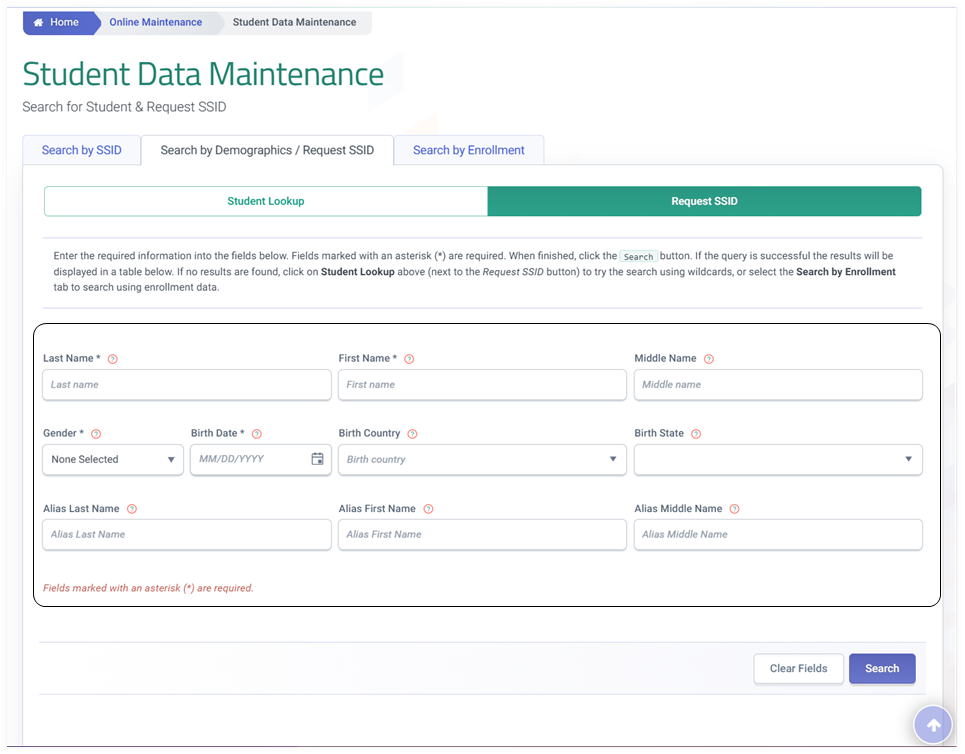
Fields
-
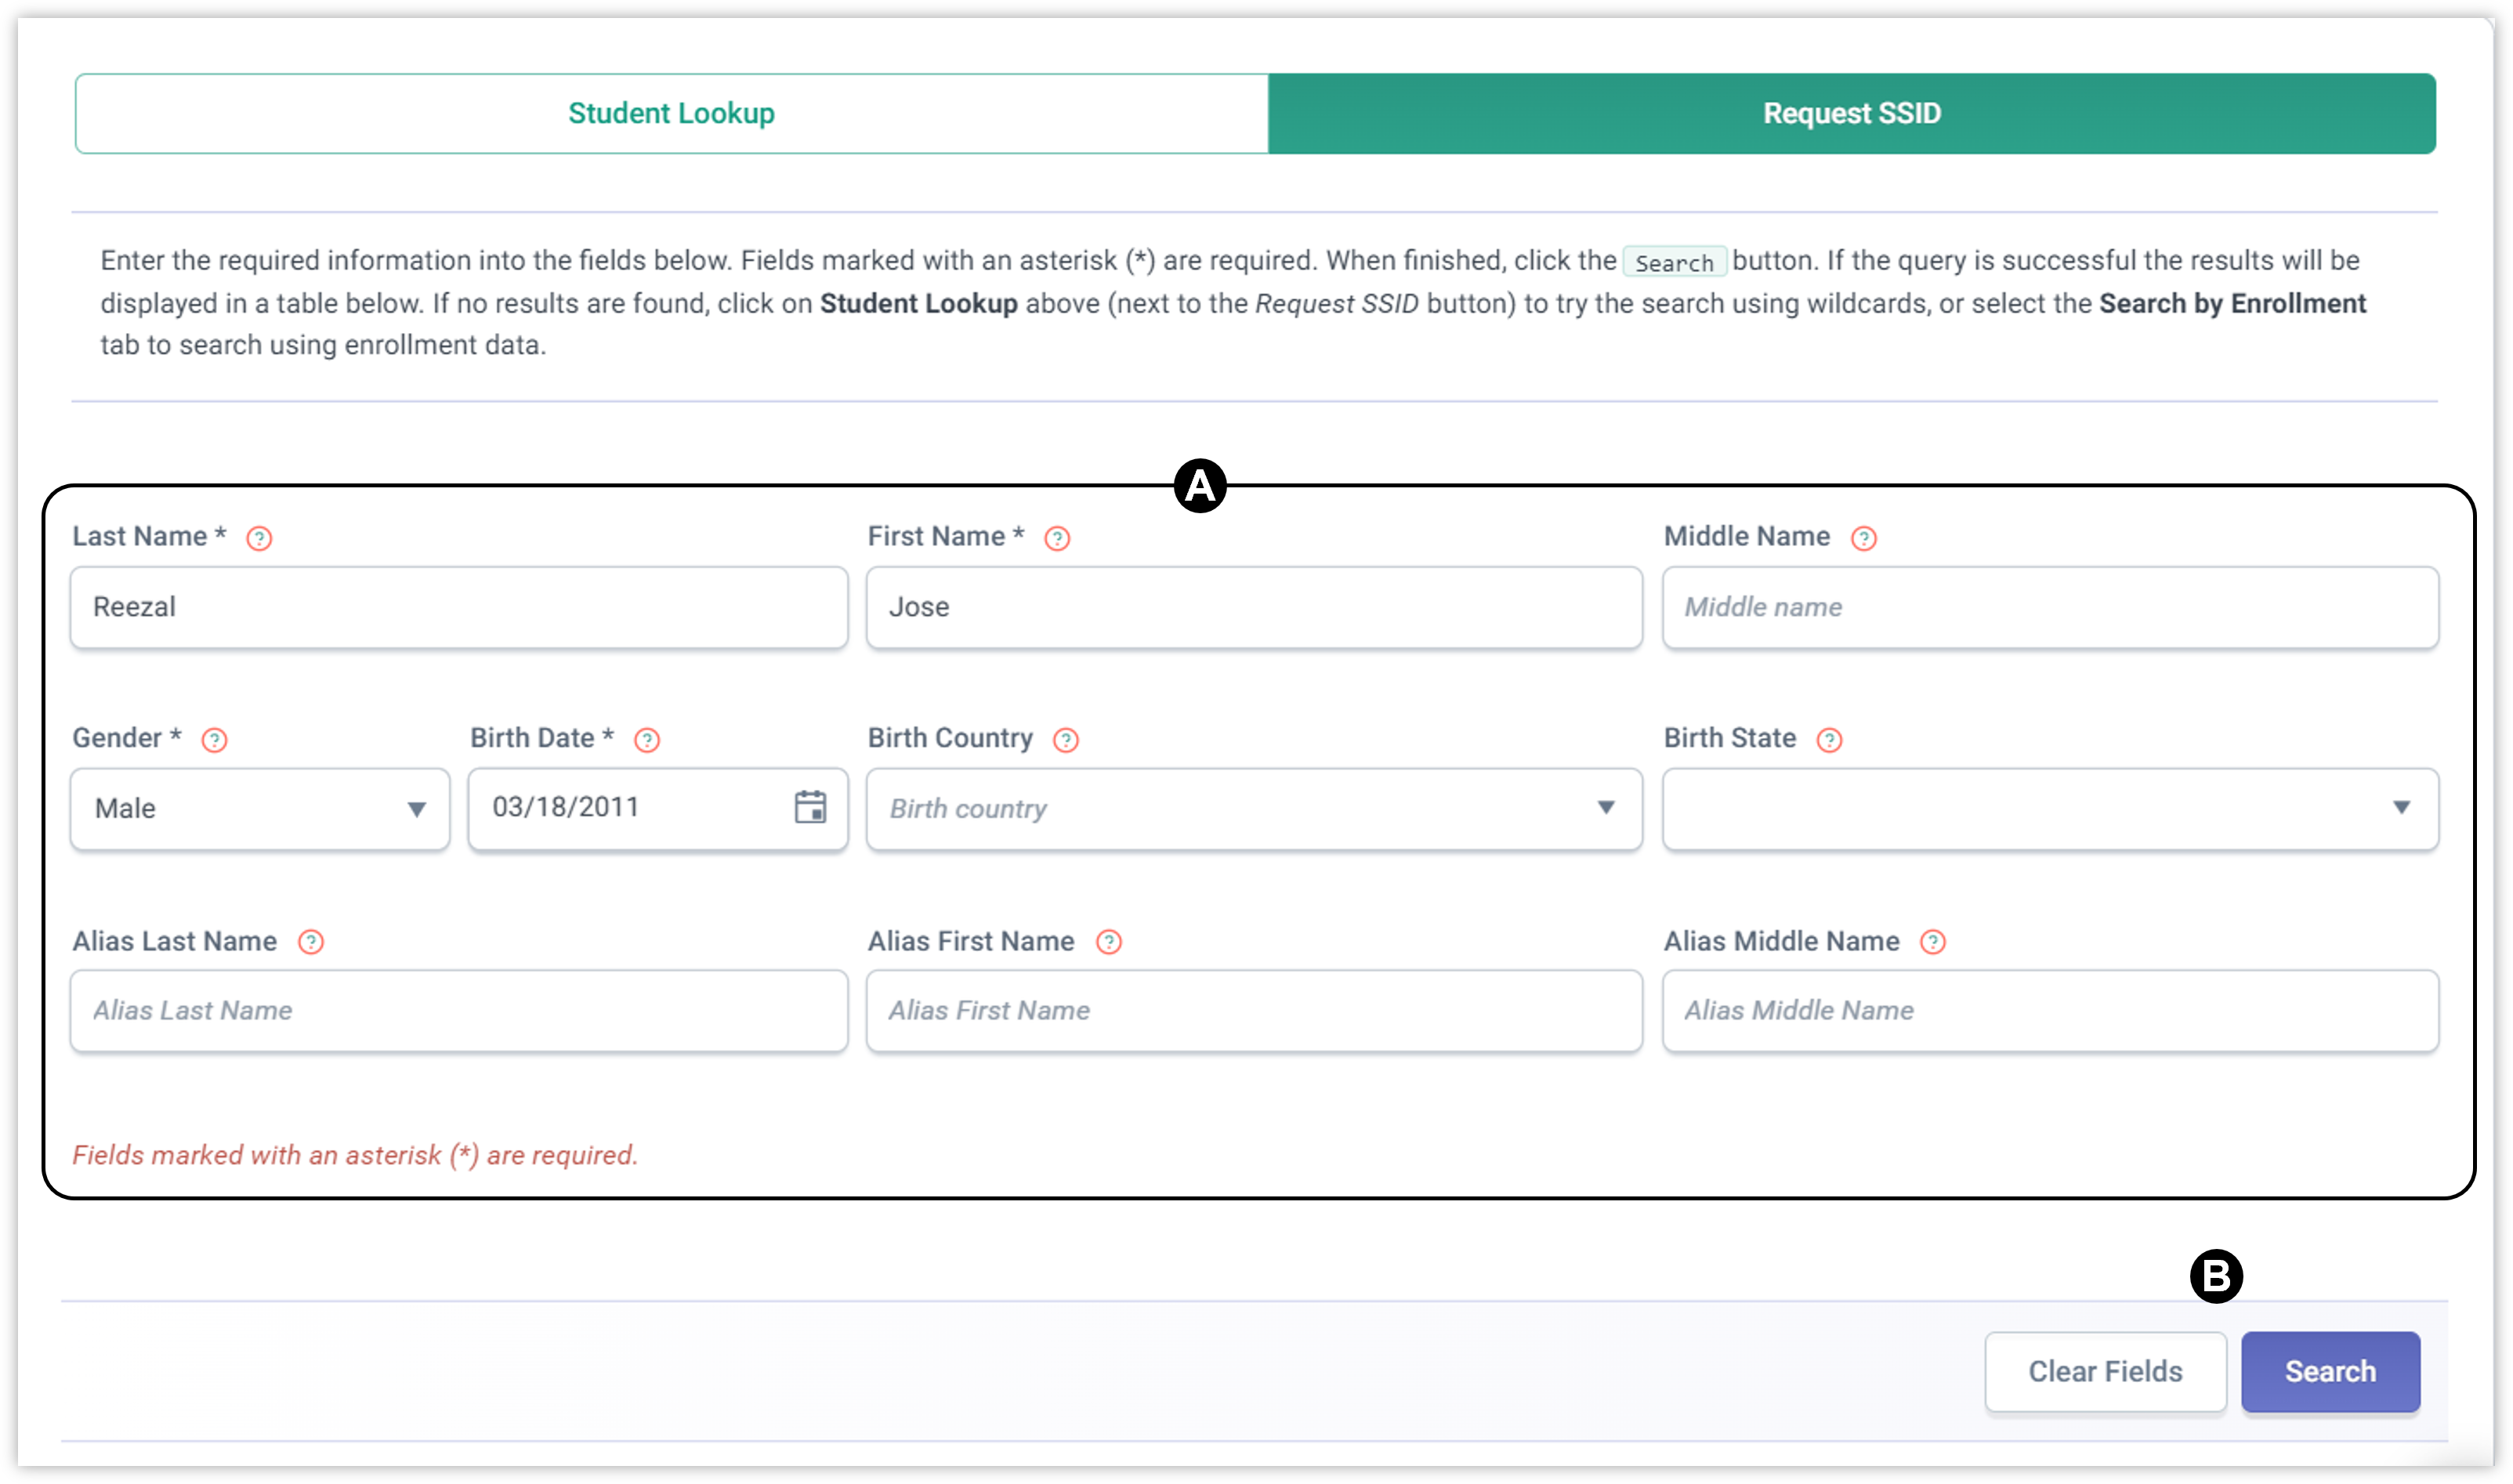
First Name, Middle Name, and Last Name - To add values, enter the exact names in the provide search fields. Wildcard search using (*) asterisk is not permitted in the Advanced Search.
-
Gender - Users have the option to either click on the Male or Female radio button.
-
Birth Date - To add a value, enter a date in the MM/DD/YYYY format or click on the Calendar icon and select a date from the tool.
-
Birth Country - To add a value, select from the dropdown list.
-
Birth State - Only used for students born in the USA, Canada and Mexico. To add a value, select from the dropdown list
-
Alias Last Name, Alias First Name, and Alias Middle Name fields will be Blank. To add values, enter the names in the provided text boxes.
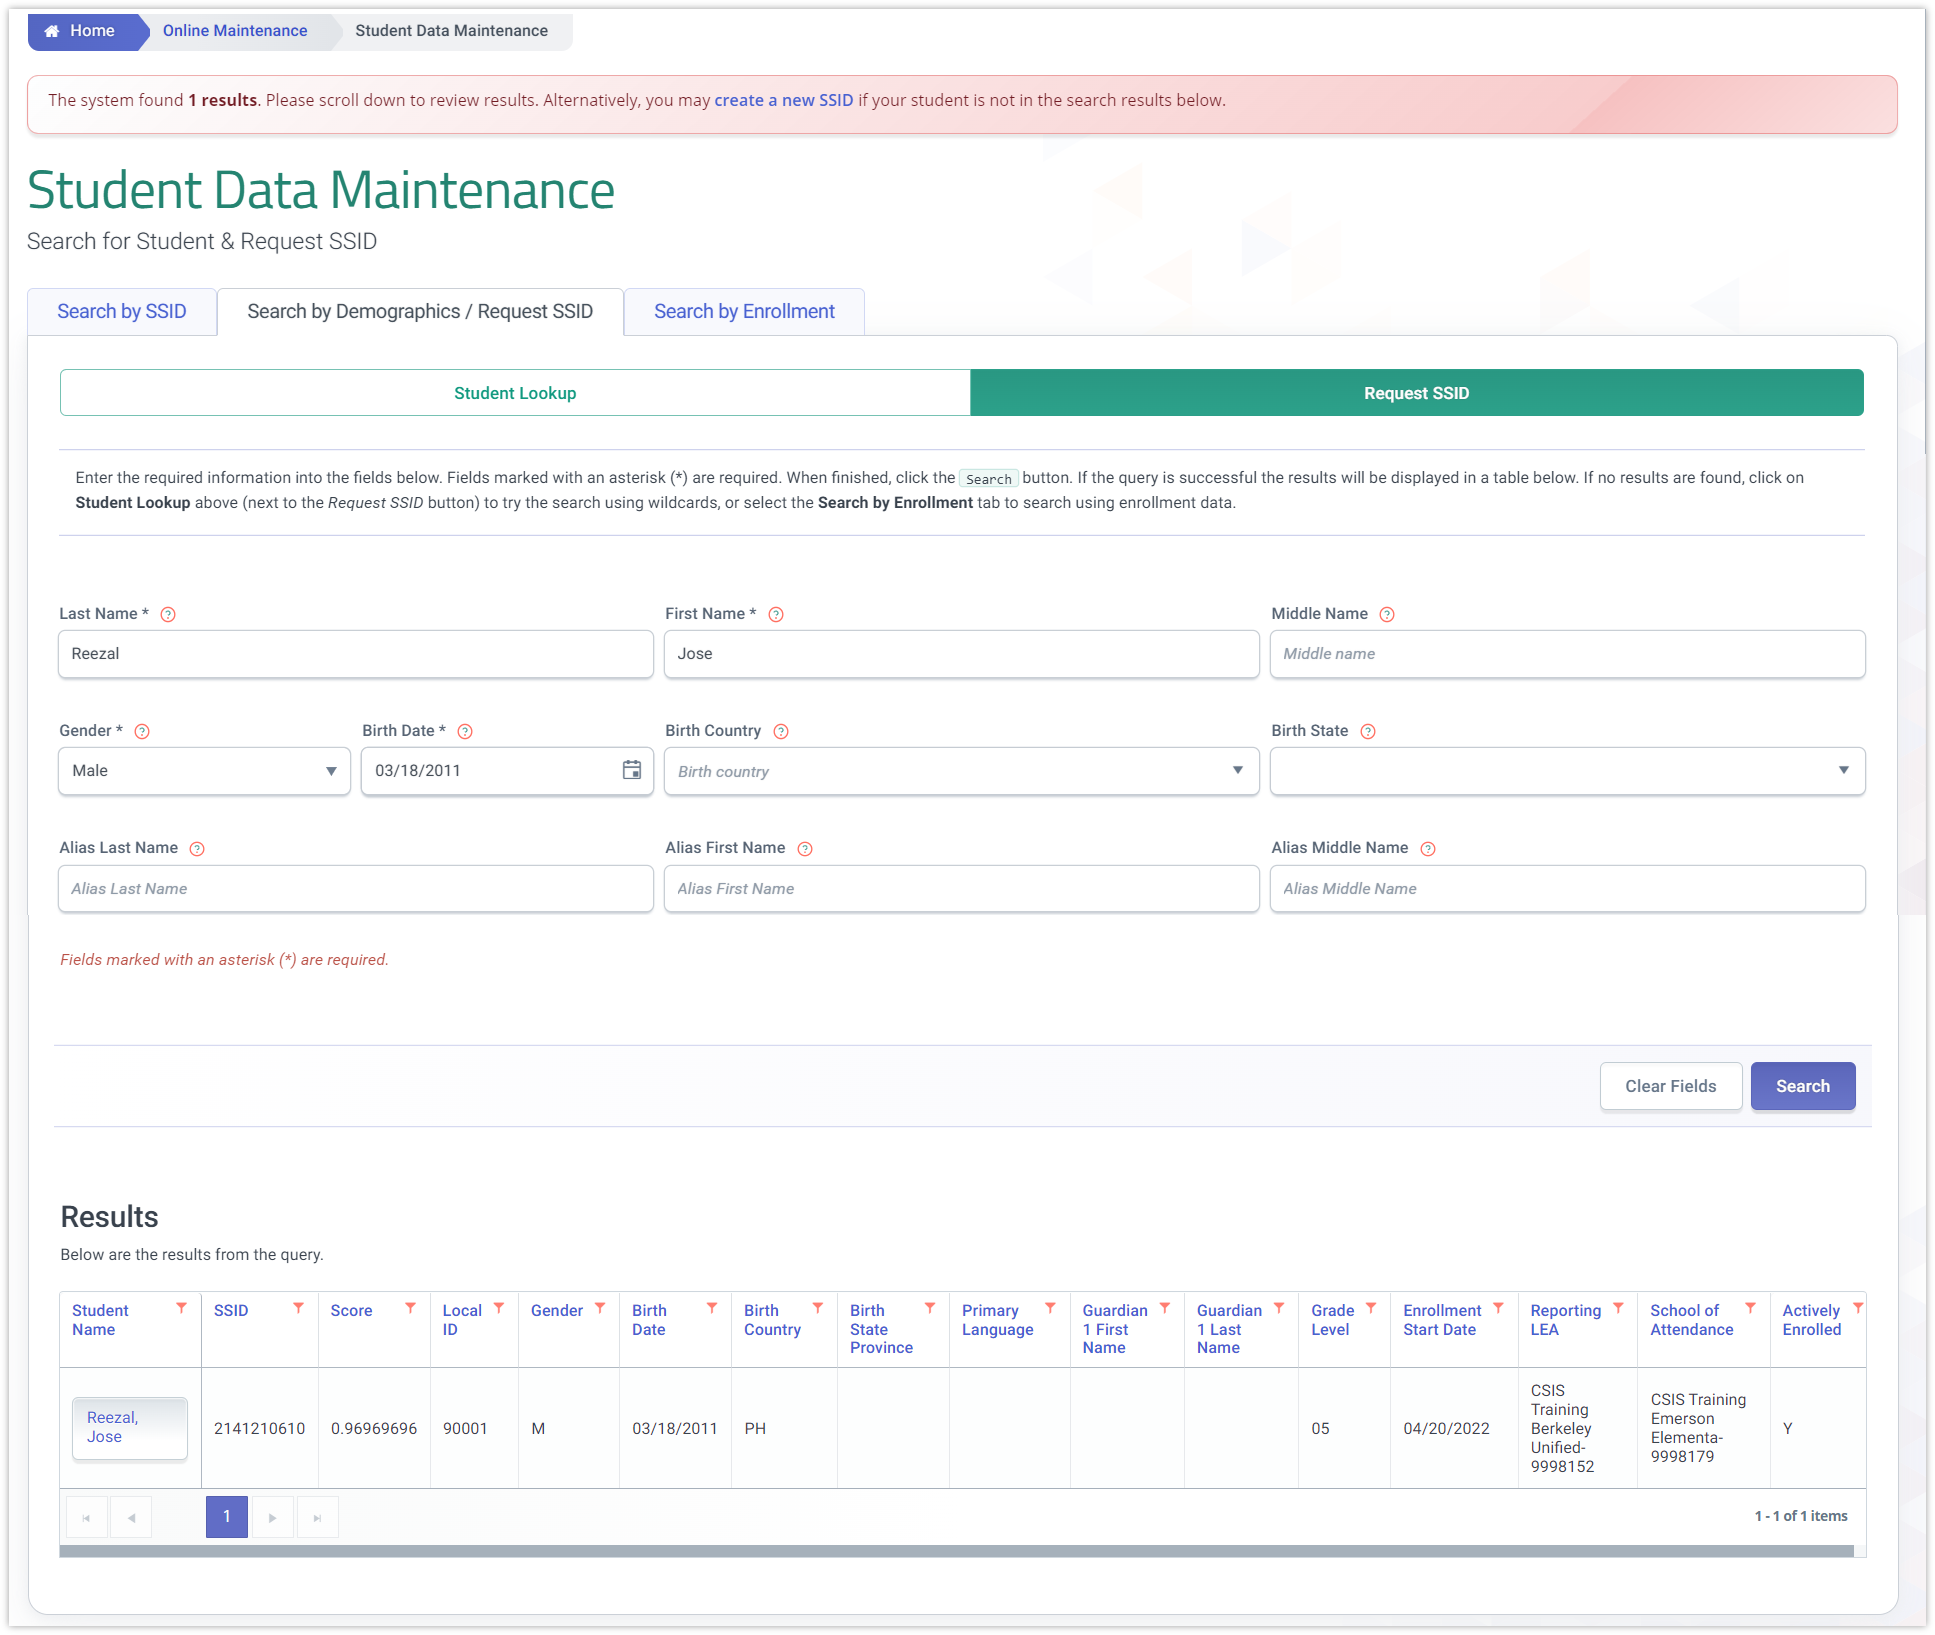
Step 3. Populate, at the minimum, the required search criteria (A) and then click on the Search button (B) .
Note: The wildcard search functionality will not work in the Request SSID option. Users must populate the exact information in the search fields.
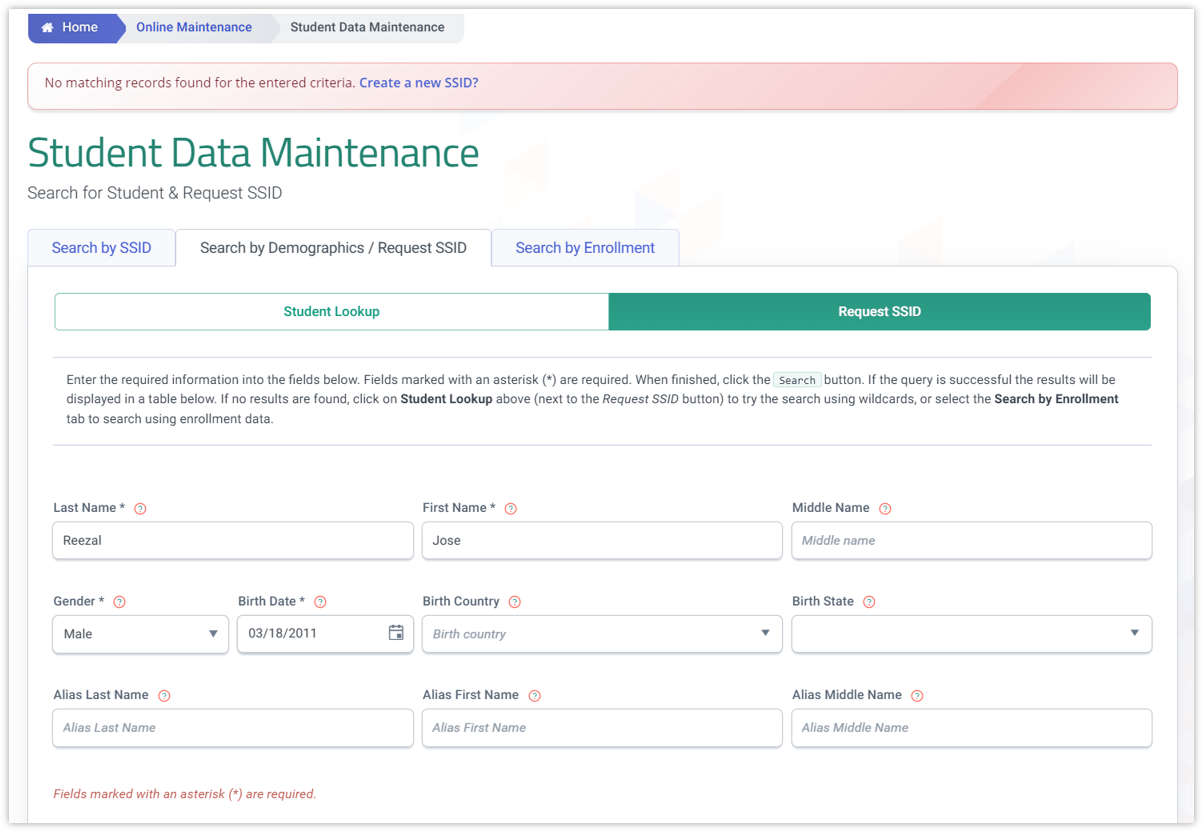
Step 4. If populated parameters do not bring back a match, users will be notified that no match was found and a link to create a SSID is available to click on as a suggested option.
Step 5. If populated parameters bring back a match, the results are listed below the search fields. Choose and click on the student name of the possible match.
If the results do not bring up the desired match, the user can click the Create a new SSID link if they wish to create a new unique SSID.
Step 6. When the student name of possible match is clicked, are directed to the student detail page where records can be added or edited.

Step 7. If the results do not bring up the desired match, and the user clicks on Create a new SSID link, the system may trigger a warning about a potential MID if a new SSID is created. Users may ignore the warning and just click on the Yes button.

Step 8. Once the Yes button is clicked, the user is directed to the New SSID Enrollment page where additional fields are required to be populated (see fields with (*) asterisk).
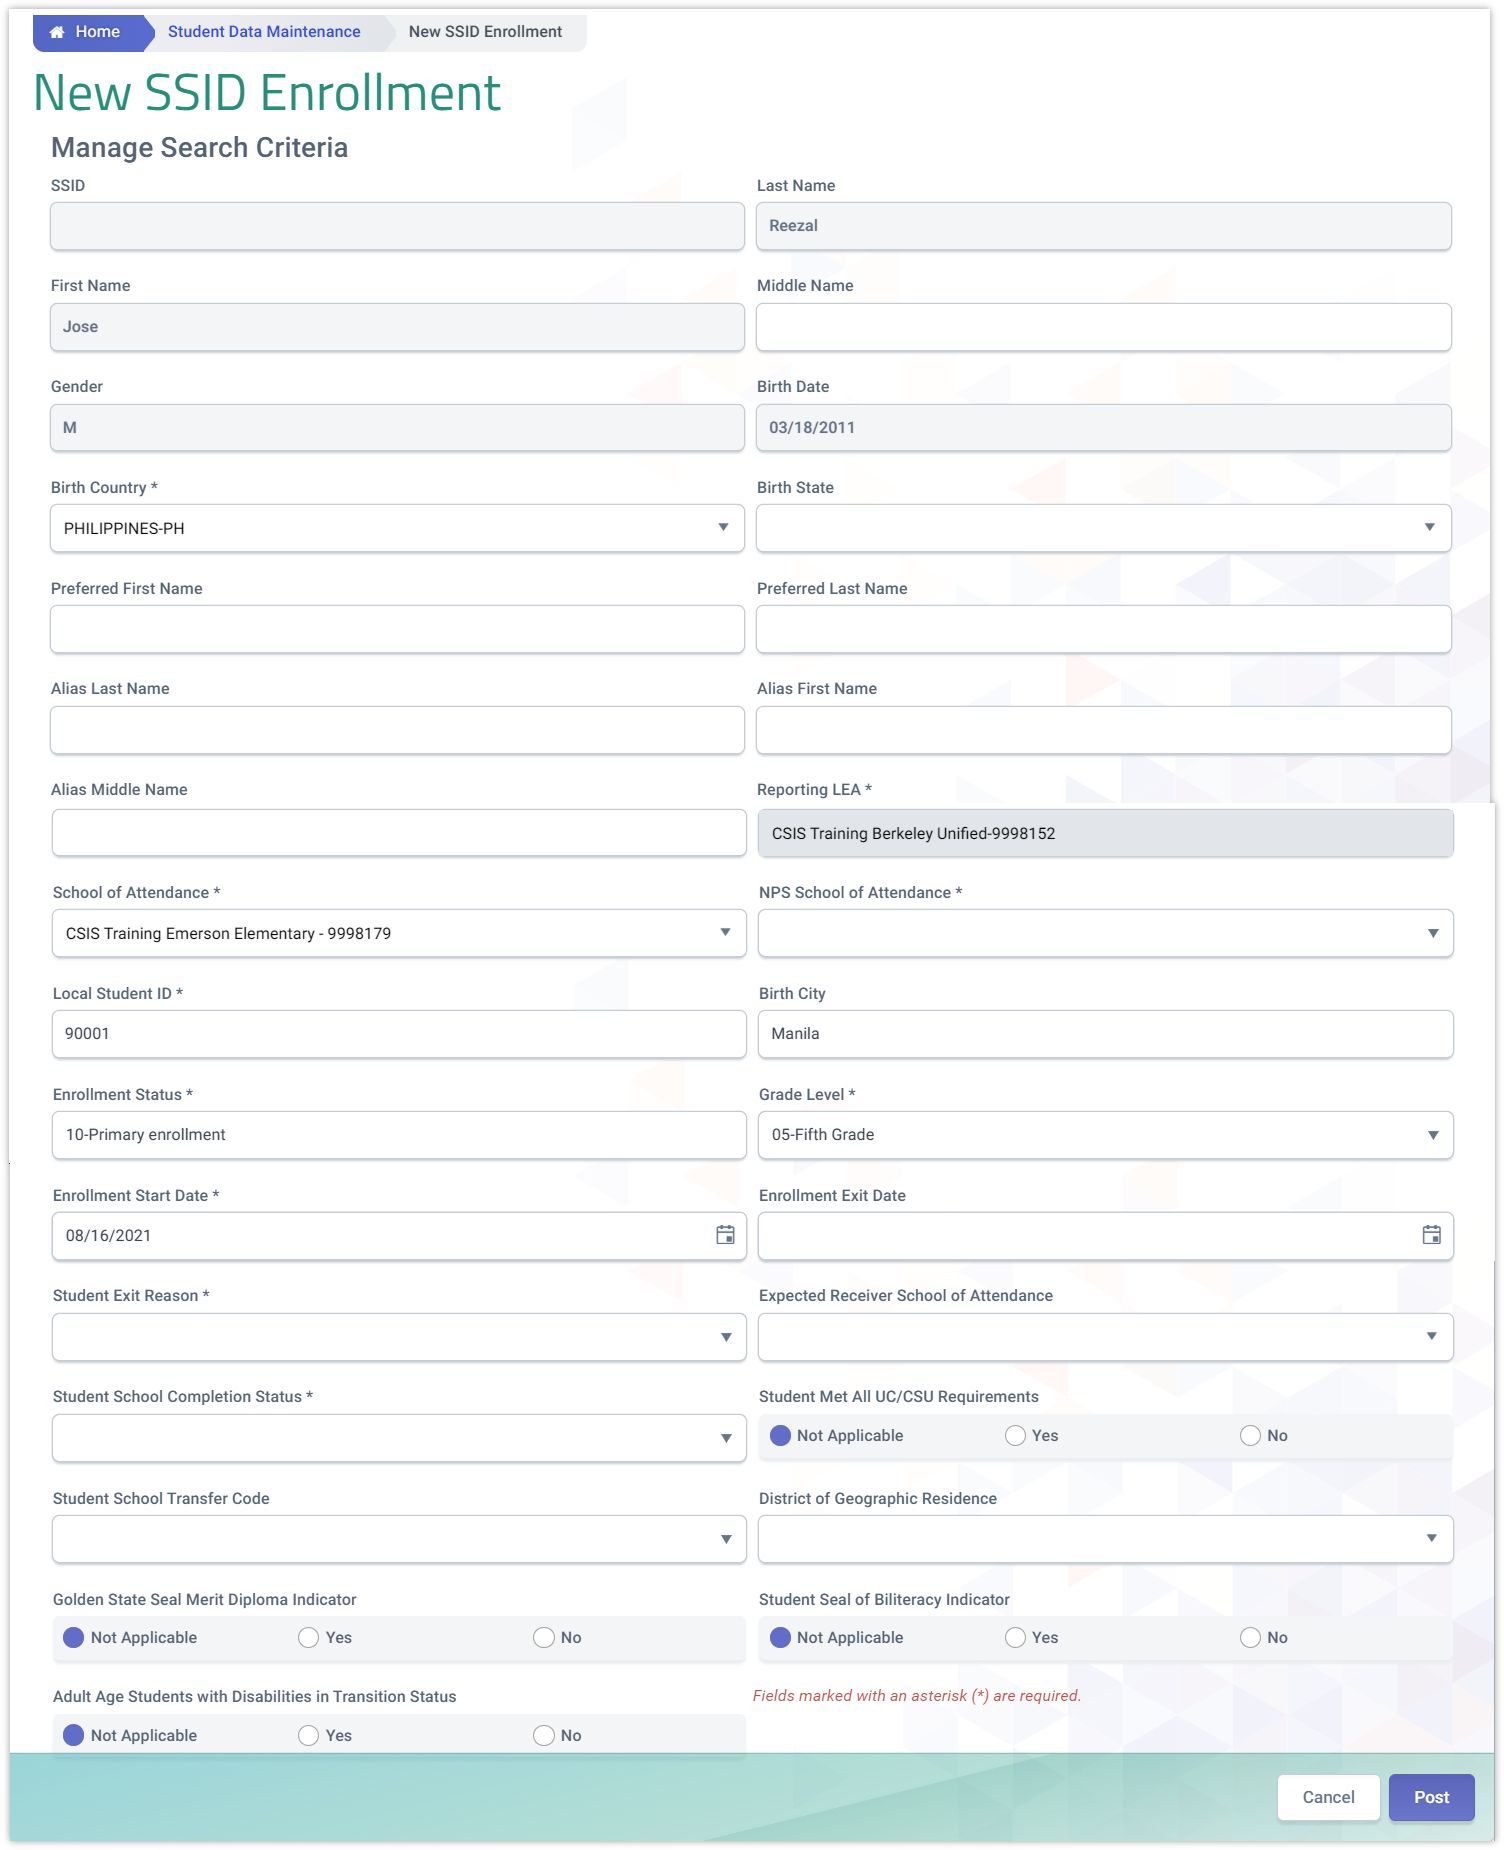
NEW SSID Enrollment Fields
The SSID enrollment fields are always accessible to be populated or edited. However, during the process of requesting a SSID, some fields are active while others are disabled. Users are creating a shell enrollment with only the required fields expected to be populated to allow the generation of a SSID when posted. Once a SSID is successfully created, the user may then be able to populate the other student details.
| Field | Description | Required | Validation/Business Rule |
|---|---|---|---|
| SSID | Student ldentifier | N | Grayed out until valid student and enrollment data is supplied, validated and posted. |
| Last Name | Legal Last Name | Y | Field must contain the student’s complete Legal Last Name that may only include Alphabetic letters, numbers, periods, hyphens and apostrophes. |
| First Name | Legal First Name | Y | Field must contain the student’s complete Legal First Name that may only include Alphabetic letters, numbers, periods, hyphens and apostrophes. |
| Middle Name | Student Legal Middle Name | N | Field must contain the student’s complete Legal Middle Name that may only include Alphabetic letters, numbers, periods, hyphens and apostrophes. |
| Gender | Gender Code Key | Y | Must be a valid selection from the Gender Category Code Set to indicate the student’s gender. |
| Birth Date | Student Birth Date | Y | The date must be in the MM/DD/YYYY format. |
| Birth Country | Country Code Key | Y | Must be a valid selection from the Country Category Code Set to indicate the country where the student was born. |
| Birth State | Birth State Code Key | N | Must be a valid selection from the State/Province Category Code Set to indicate the State where the student was born. |
| Alias Last Name | Last Name alias | N | Complete alternative Last Name for student that may only include alphabetic letters, numbers, periods, hyphens and apostrophes. |
| Alias First Name | First Name alias | N | Complete alternative First Name for student that may only include alphabetic letters, numbers, periods, hyphens and apostrophes. |
| Alias Middle Name | Middle Name alias | N | Complete alternative Middle Name for student that may only include alphabetic letters, numbers, periods, hyphens and apostrophes. |
| Reporting LEA | Reporting Entity | Y | Lookup/Dropdown list should be disabled on this UI |
| School of Attendance | Student’s school | Y | Value must be selected; the user may enter one or more alphabetic or numeric characters Account holder must have org role for selected school |
| NPS School of Attendance | NPS School | Required if CDS code for School of Attendance is equal to ‘0000001’ | School must be associated with Reporting LEA If the School of Attendance is identified as 0000001, the school must be an NPS school. |
| Local Student ID | Student Identifier within local system | Y | The unique identifier assigned to the student by a local educational agency. |
| Birth City | N | Populate with Birth City | |
| Enrollment Status | Y | Must be a valid selection from the Enrollment Status Category Code Set to indicate the state of a student’s enrollment (student’s name appears on a register, roll, or list) at a particular educational service institution. | |
| Grade Level | Y | User must select a valid grade code value | |
| Enrollment Start Date | Y | The first date a student is expected to begin attending a school. The date must be in the MM/DD/YYYY format. | |
| Enrollment Exit Date | Withdrawal Date | N | The date a student, who is not expected to return the following school year, exited or withdrew from a specific school in California. |
| Student Exit Reason | Exit Category | Required if Student School Exit Date is populated | Must be a valid selection from the Student Exit Category code list to indicate the category or conditions a student left a school in the California public educational system. If School Completion Status Code = 'Graduated' Then Student Exit Reason Code must = 'Completer Exit'. |
| Expected Receiver School of Attendance | Expected School of Attendance | If Student Exit Reason = TransEnrollDiscip or If If Ed Options School Type = X (Alternative School) If the School of Attendance is identified as 0000001, the school must be an NPS school. | The system will display a “CDS Lookup” window. The user will enter one or more alphabetic or numeric characters in the text box |
| Student School Completion Status | Completion Status Key | Required If Student Exit Reason = E230 The Y | Must be a valid selection from the Completion Status Category code list to indicate a student’s state of completion from an academic program at a particular educational service institution. |
| Student Met All UC/CSU Requirements | Met all UC/CSU Requirements | Required if If School Completion Status = Graduated | An indication of whether or not a local educational agency determined a student met all the admission requirements to the University of California or California State University |
| Student School Transfer Code | Transfer Code | N/A | Must be a valid selection from the Interdistrict Transfer code list to indicate a student’s transfer code. |
| District of Geographic Residence | N/A | The system will display a “CDS Lookup” window. The user will enter one or more alphabetic or numeric characters in the text box. | |
| Golden State Seal | Radio buttons | N | |
| Seal of Biliteracy | Radio buttons | N |
Step 9. When all the required fields are populated and the values verified for accuracy, click on the Post button located at the bottom of the page.
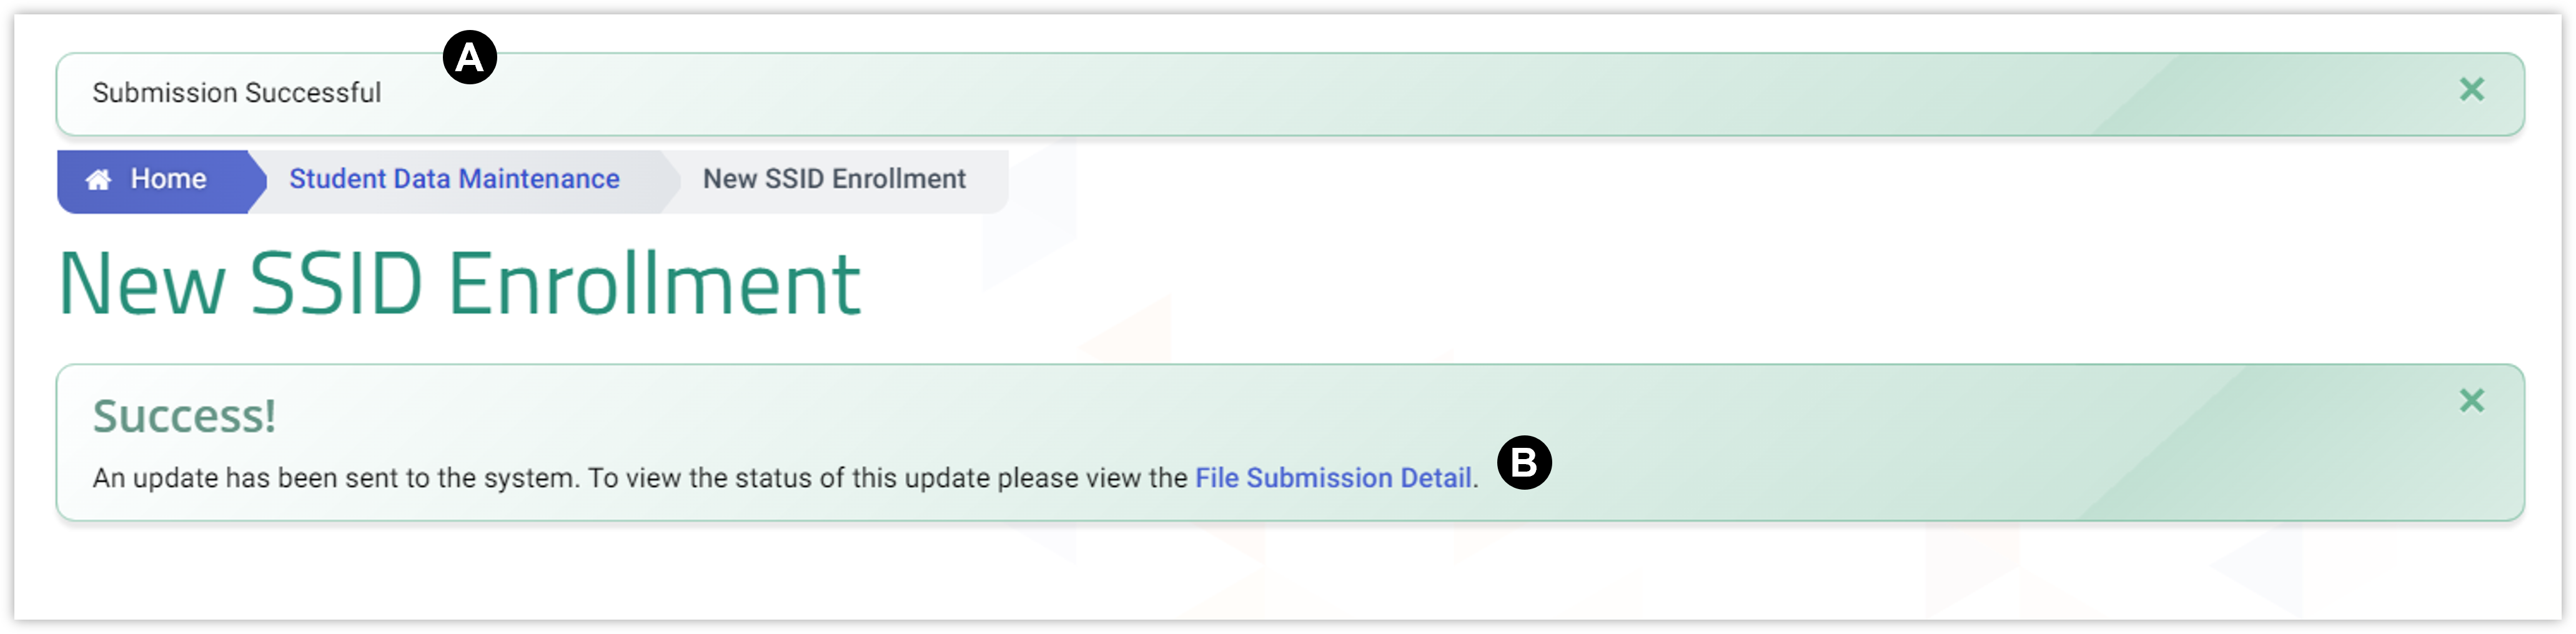
Step 10. A notification will appear at the top of the page. Confirming the Submission of the record was successful (A) as well as a link to View Submission Detail page where the status of record can be monitored (B). Please refer to the section Viewing File Submission Detail below.
Request SSID Process through Batch Upload
Step 1. From the Left Navigation menu, click on Upload/View Submissions (A). Click on File Upload (B).
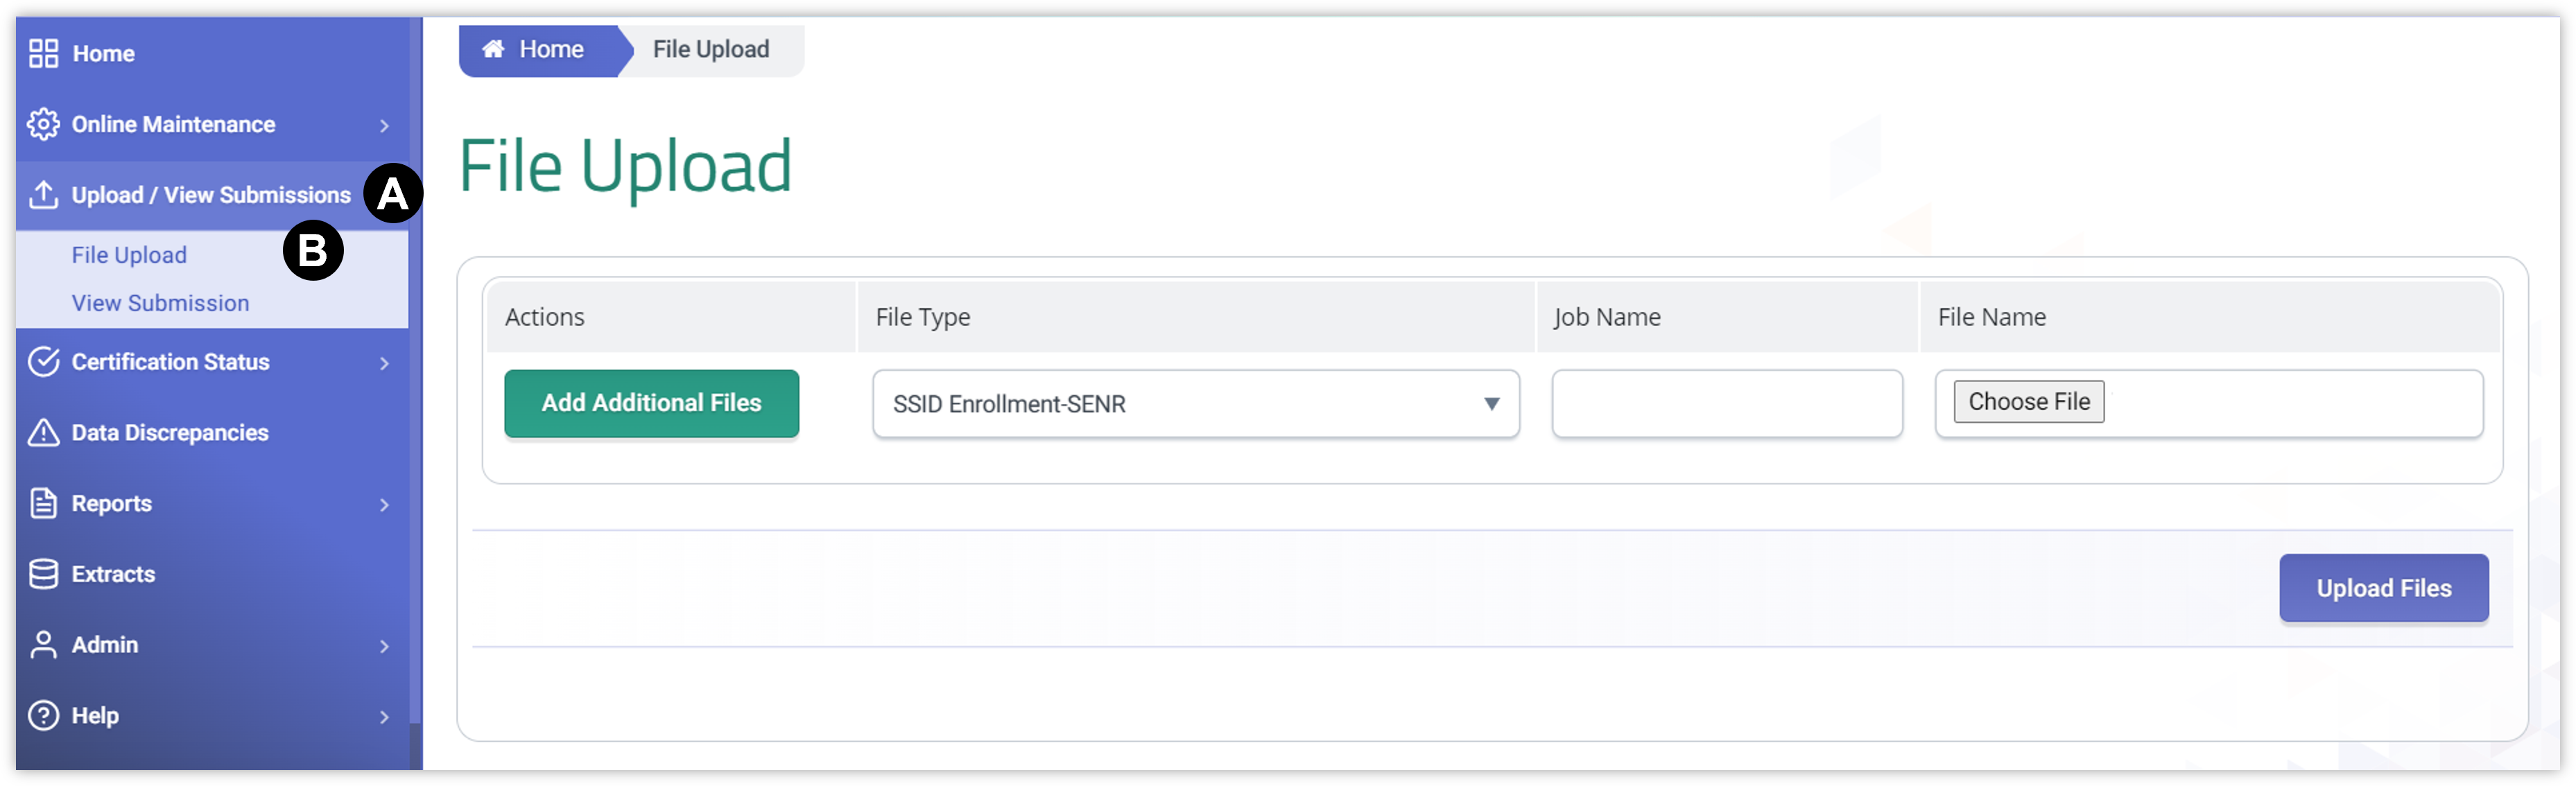
Step 2. The File upload screen will appear where the user can select the file type, indicate the JOB Name and choose the file to upload from a local folder.
NOTE: By default, the SSID-Enrollment (SENR) file type is selected.
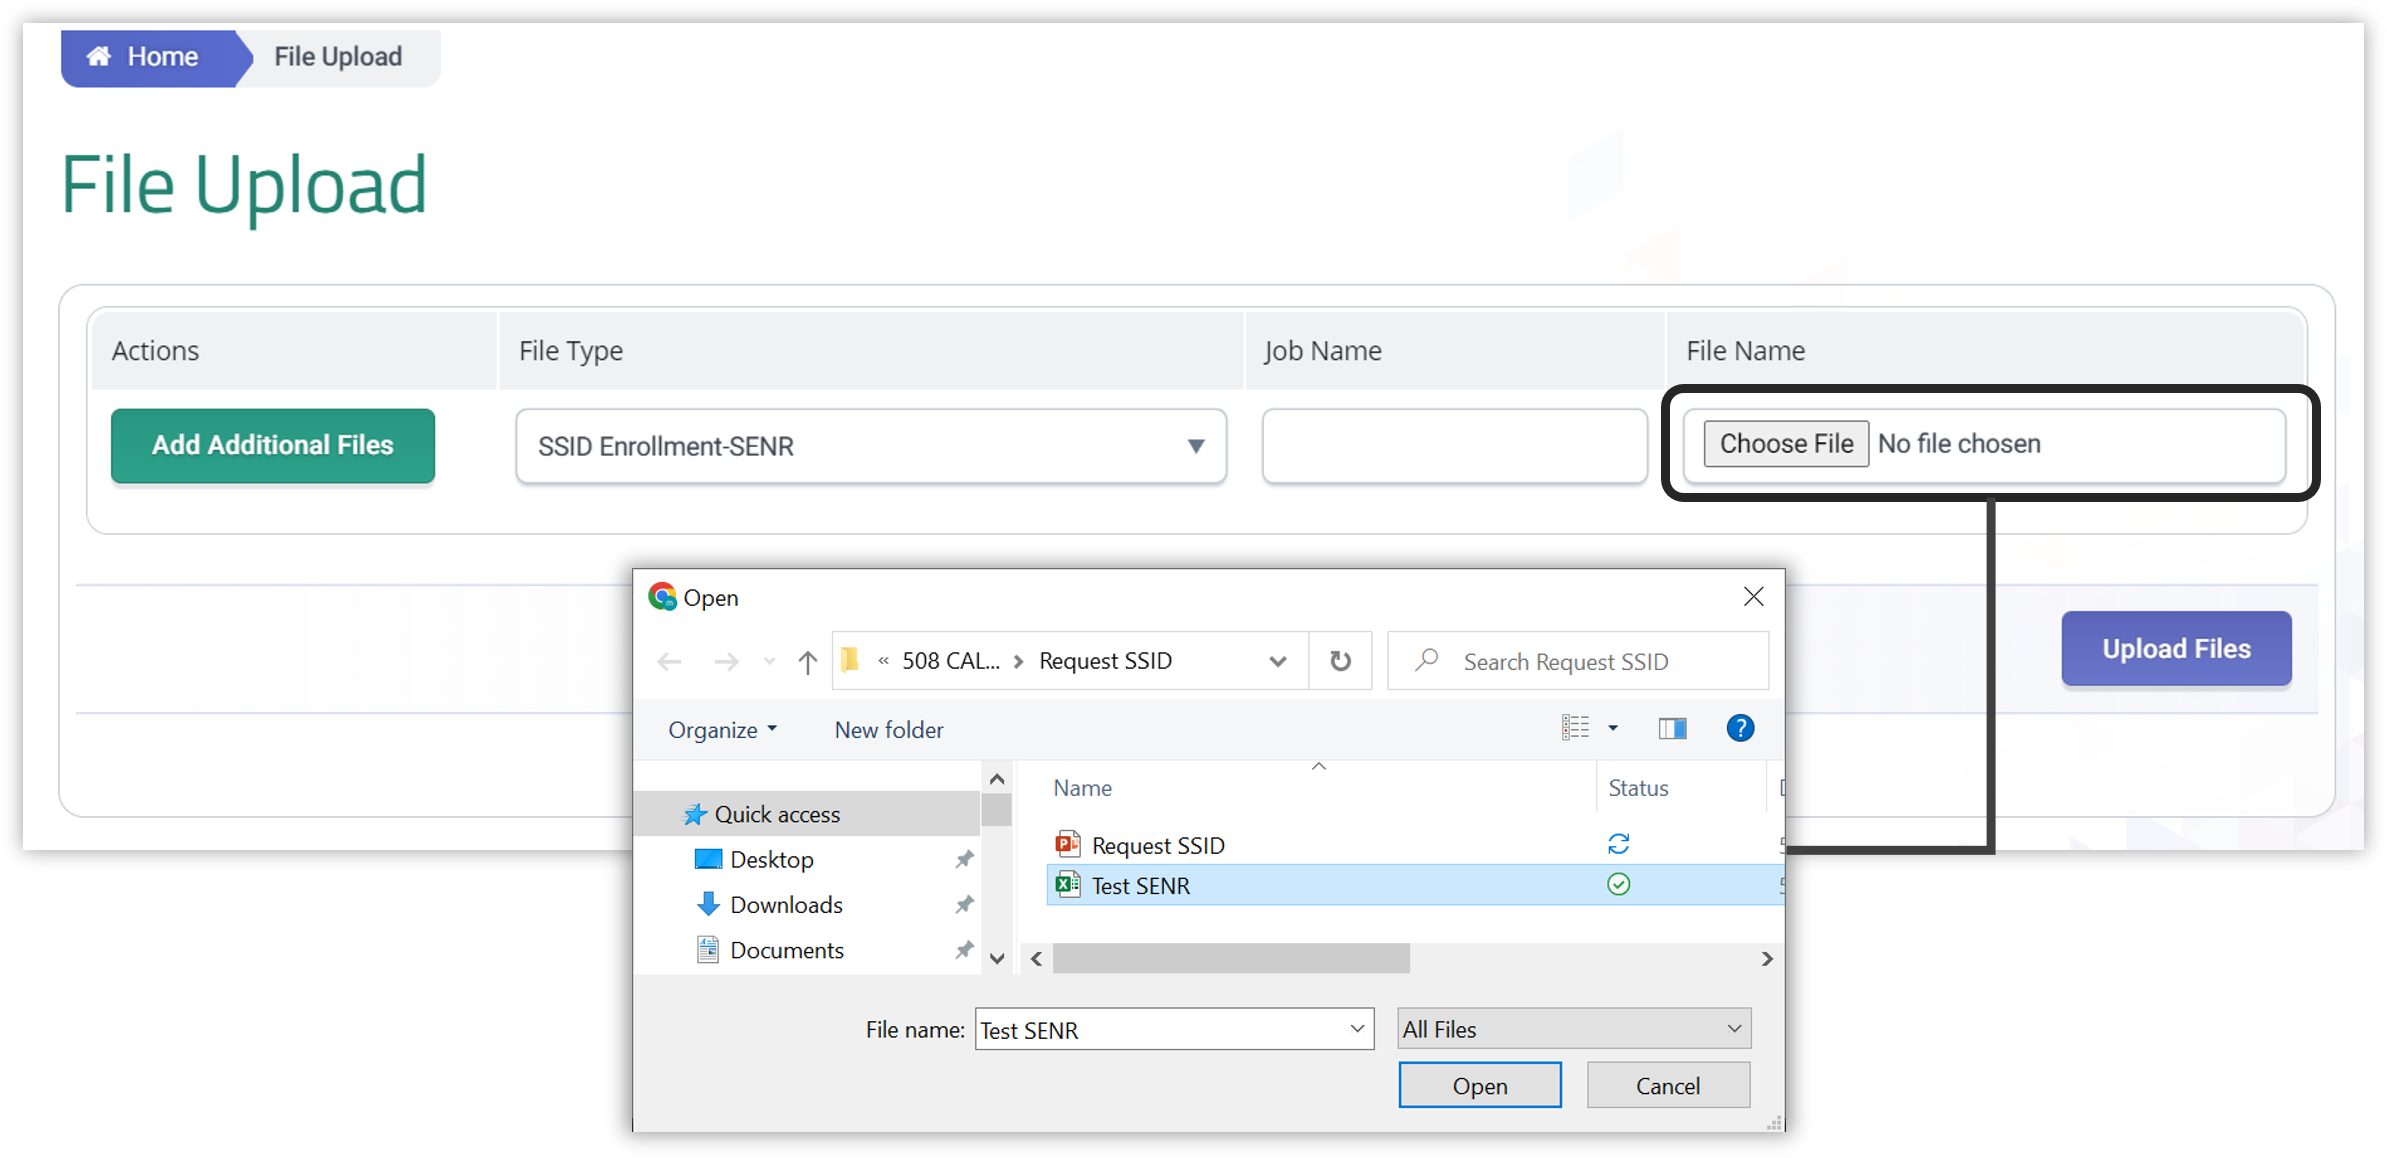
Step 3. Choose the local file appropriate to the indicated file type. Then click on Upload Files button.
The system will enforce the following defined user interface rules:
-
If a user uploads a file with a name matching an existing File Name during a submission process, the system will display the following message: “Duplicate File selected. A file can be selected for upload only once.”
-
If a user upload a file with no records, the system will display the following message: “No records found in file, upload has stopped processing.
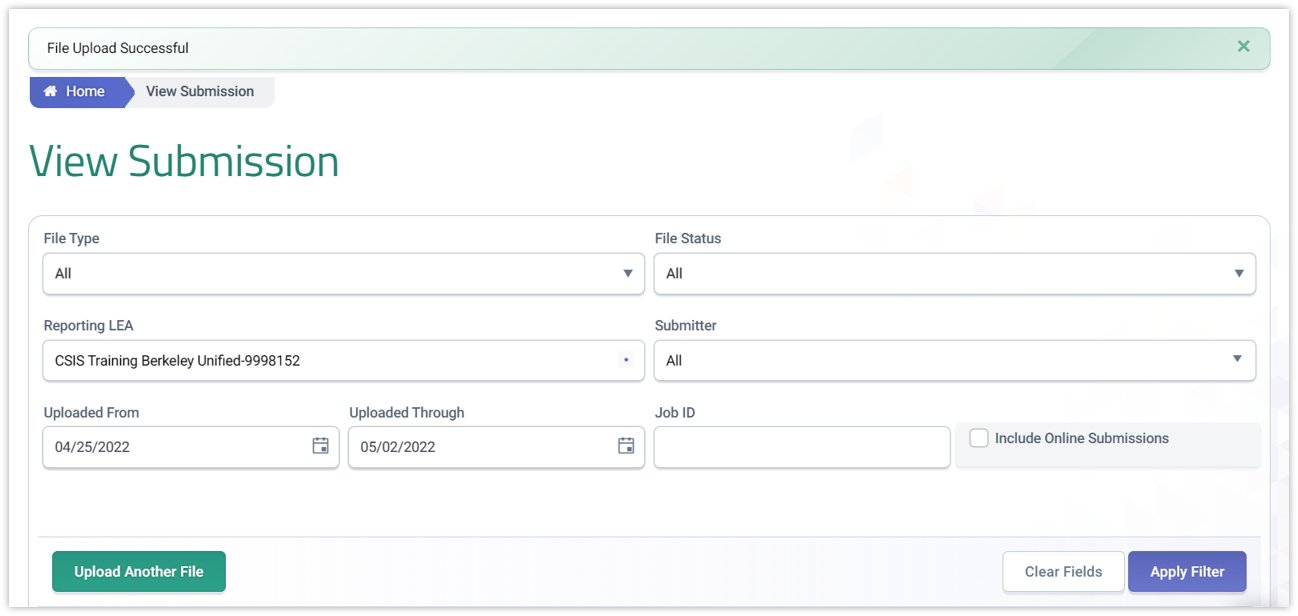
Step 4. Once the file is uploaded, the user is redirected to the View Submission page where a notification of successful upload appears. Clicking on Apply filter or refreshing the page, reflects the uploaded file under results. Please refer to the section Viewing File Submission Detail below.
Viewing File Submission Detail
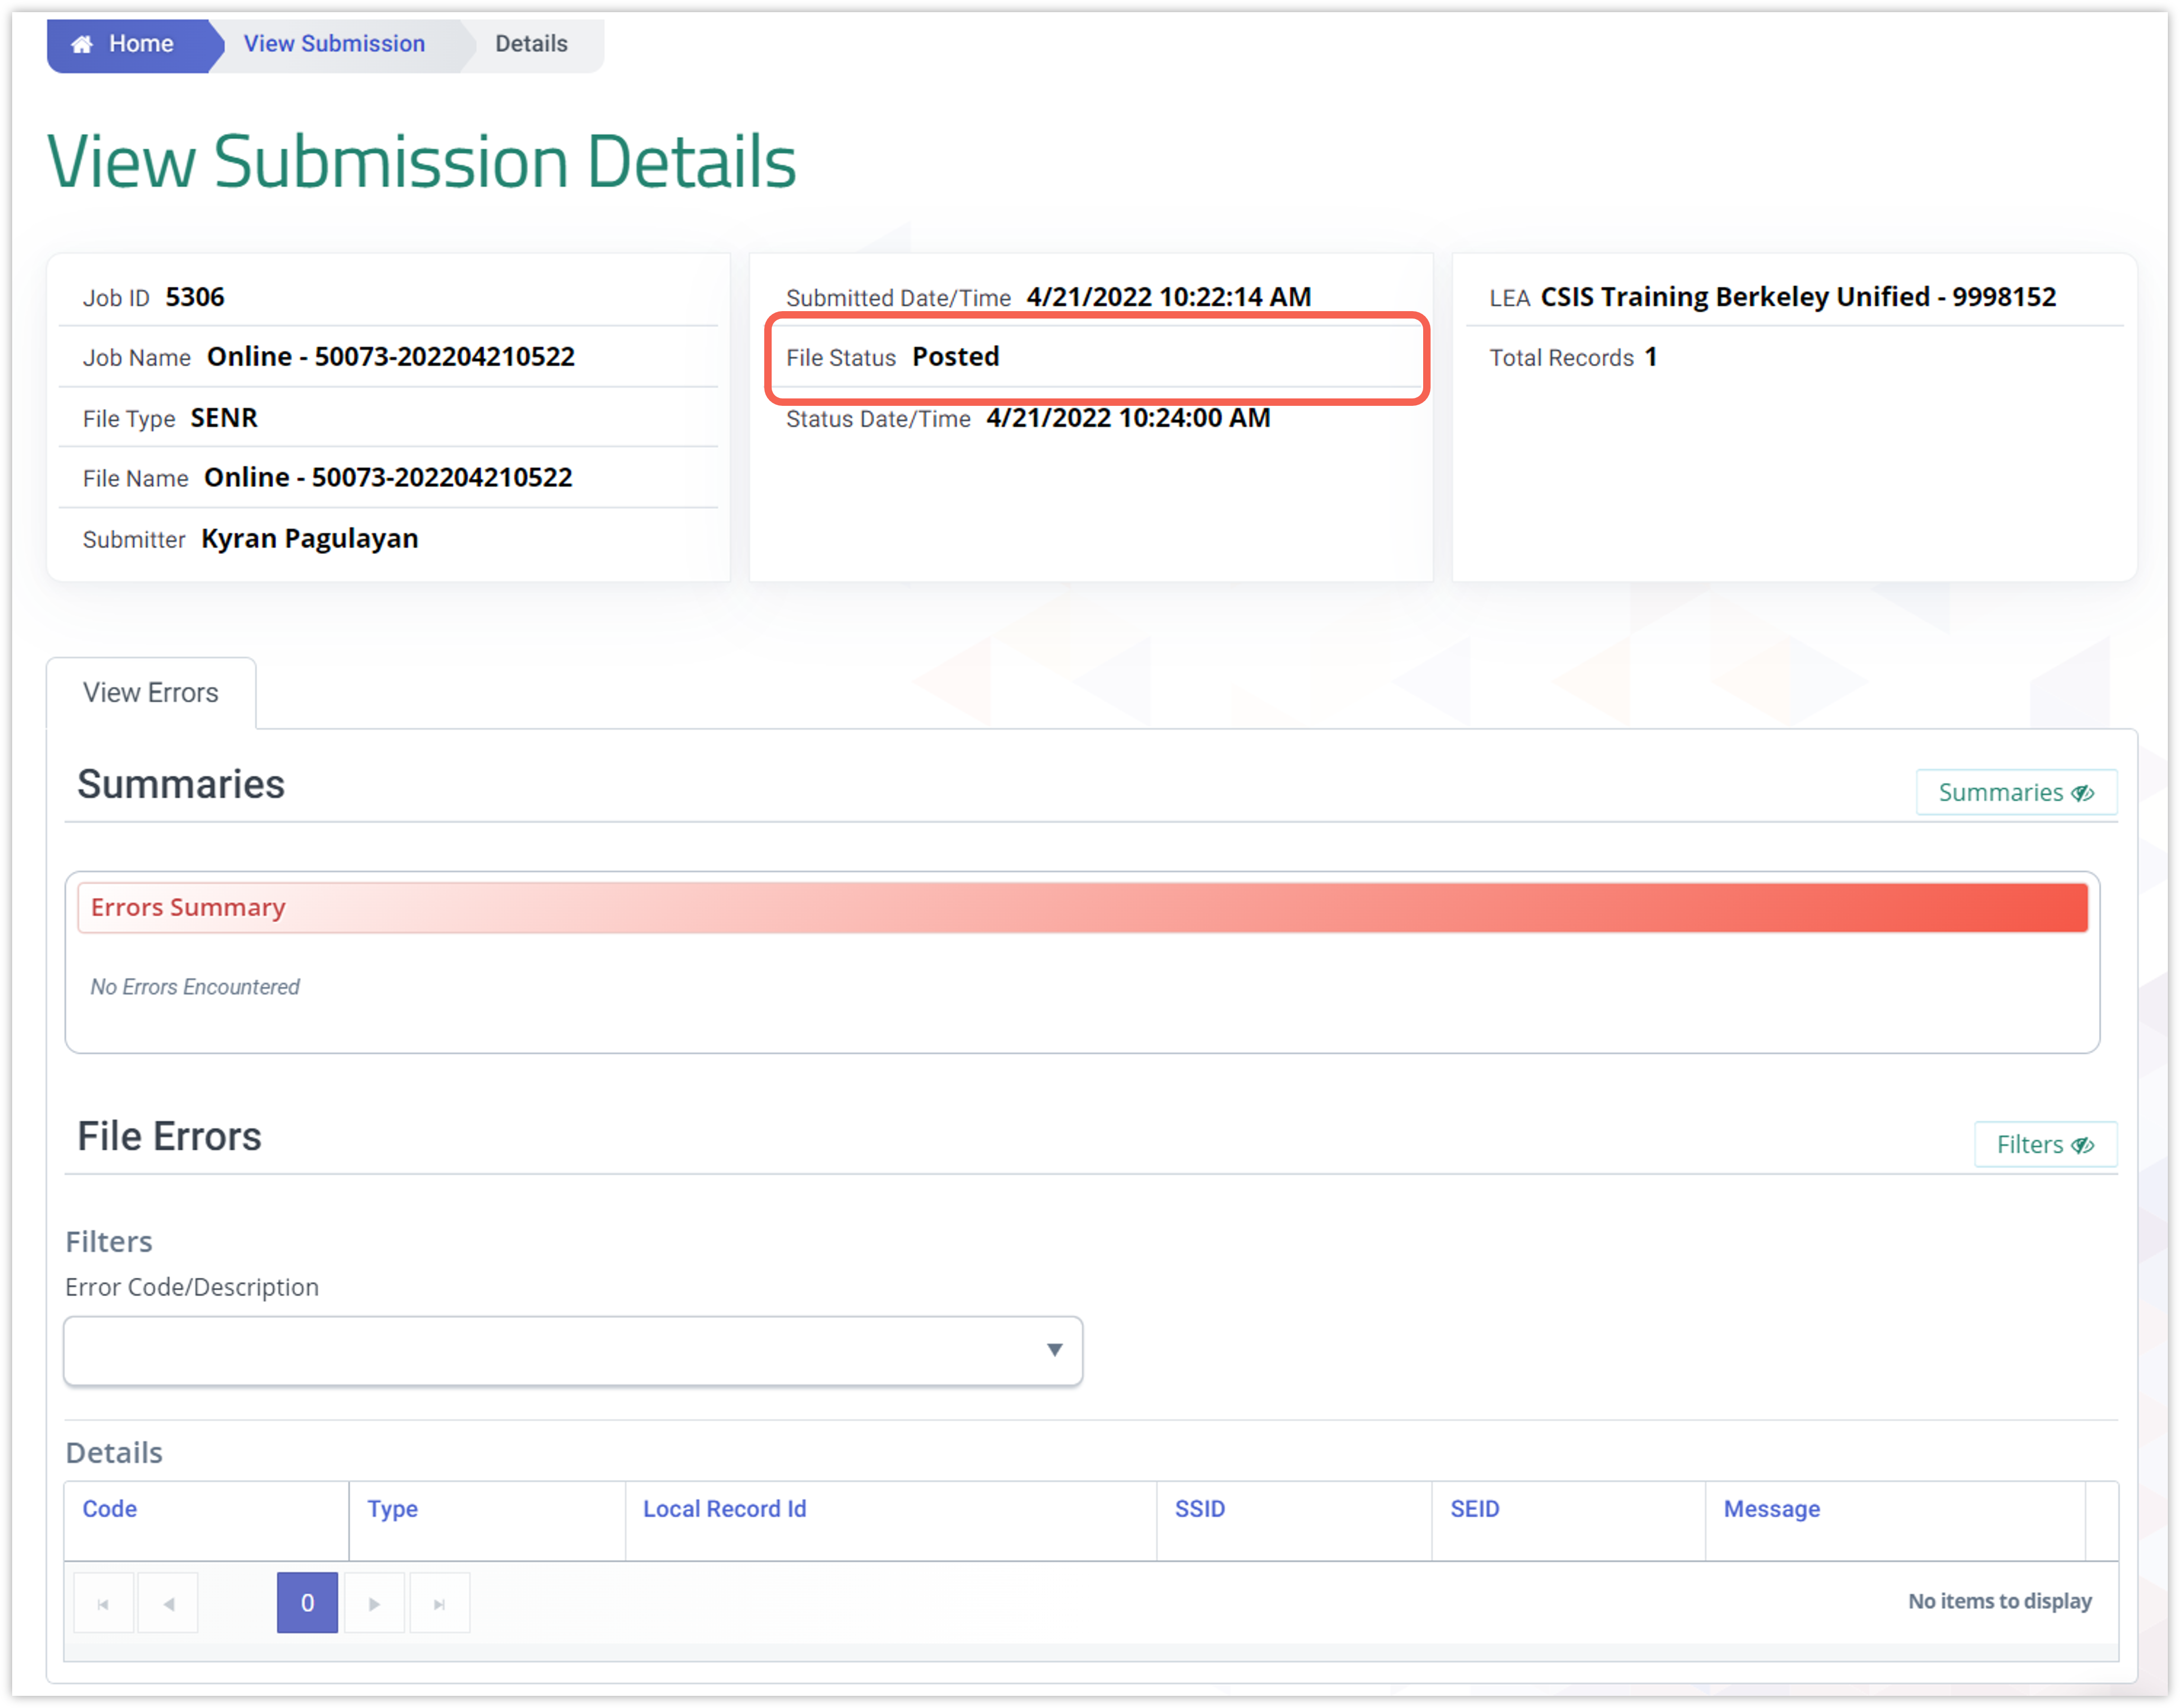
After a batch file or online SSID request is posted, users are redirected to the View Submission details where the status of the record or file is monitored.
Step 1. Once at the View Submission Details page, depending on the process of requesting SSID (Batch file or online maintenance) the user will see any of the sample scenario below.
Viewing File Submission Detail (Online Maintenance)
User will see the Job Name prefixed by the Online designation, as well as the status of the file or online job.
The file will take a moment to process so check back later using View Submission search, Job ID is an easy way to find the submission.
Please see File Status Table for a description of each status.
Viewing File Submission Detail (Batch Upload)

Submission File Status Table
| Status | Definition |
|---|---|
| File Upload & Preparation | |
| Created | File upload was successful, validations have not run on the data yet. |
| Failed | File upload was not successful, the system did not receive the file. The user needs to reformat the file or reach out to customer service for assistance. |
| Standardizing | Converting to batch file. |
| Standardized | File converted. |
| Staging | File is in staging database and is processing. |
| Staged | File has been processed in staging database. Once the file is posted, the staged data is purged. |
| File Input Validations | |
| Validating | Data is being validated through IVR processes. |
| Validated | File has been processed; user can review errors. |
| Posting | Records are posting to |
| Posted | Records are posted - data have passed all input validations and the records are committed to the database. |
| Rejected | File uploaded successfully but triggered full rejection when file input validations were executed. The file input validation errors should be resolved before data is resubmitted. |
Identifying the SSIDs for newly acquired students
There are 2 ways to determine the issued SSIDs for newly acquired students.
Through SSID Extract
When requesting the SSID extract, shorten your date range to a more recent period. Should the generated extract include all students, you can sort it by enrollment start date from newest to oldest. To do that, download the SSID Extract template (https://documentation.calpads.org/Support/FileTemplates/#extract-templates) and then follow instructions below.
Download the SSID Extract Template and follow the steps below in converting the extract.
- Download SSID Extract Template.
- Open the template.
- A protected View message will appear at the top, you may click on Enable Editing.
- Another security warning will appear at the top concerning a disable Macros. Click on Enable Content.
- Click on Import SSID Extract File button.
- Locate the downloaded SSID extract you requested from CALPADS.
- Once you click on the file, the template will then gather the information from the extract and list the data extracted.
- Sort the enrollment start date to show the most latest at the top to see the most recently created SSIDs.
Through Online Maintenance
- Click on Online Maintenance.
- Click on Student Data
- Click on Search by Enrollment tab
- Filter for desired schools
- Under Select Status, Choose Currently Enrolled
- Click Search
- Scroll down to Results to see generated list.
- Click on Local ID header to sort list until orange arrow switches to descending. You will see your new students listed at the top of the list with their SSIDs. (Assuming these are new students to your LEA and Local ID numbers are issued).
Additional Resources
Post Process Redevelopment Primer
CALPADS File SpecificationsForm
Look for Student Enrollment Tab